One of the cool things you can do so easily in a DAW (Digital Audio Workstation) is slip entire tracks, or actually the regions within it, to the left (earlier in time) or to the right (later in time).
What’s so cool about this?
There’s a couple of things you can do with it.
1. Correcting Microphone Delays
One fairly obvious example is tightening up drum kits. It’s pretty common to use room mics when recording a drum kit. Let’s say your room mics are 3m (9.8feet) from the snare mic on the kit. That’s about an extra 8 milliseconds, or (@44.1kHz sample rate) 353 samples.
If you slid your room mic regions 8ms/353 samples to the left, the recorded signal would coincide perfectly with the snare mic – ie there would be no delay between the mics.* Note that you’ll need to have all your tracks starting a little bit later than 0′:00″ or Bar 1 so you have some “left” to go to.
You don’t have to pull the room mics all the way back though – you might just want to pull them a bit closer in time to tighten up the room sound.
2. Creating a Pocket/Helping the groove
This is where you can subtly shift the timing of regions to help the overall groove of the track.
For example, many bass players get a little excited when recording, and can play a little ahead of, or right on top of the drum beat. Although it’s still “in time”, sometimes delaying the bass very slightly can make it “groove” more with the drums.
In this case you would incrementally slip the bass region/s to the right until the groove feels better. The kick drum often masks the attack of the bass to a certain extent, so it can also clean up the kick/bass combination.
It can help to think of being “in-time” as a window rather than a vertical line, and you can be at one edge or the other of that window and still be in time, but get some huge changes in “feel”.
How to do it
There’s a couple of methods.
Shifting the actual region itself using “nudge”. In Logic or Pro Tools you can incrementally bump something in either direction by using the nudge keys. You can set the nudge value to pretty much anything -samples, beats etc. The dangers of this method are if you give the files to someone else to mix they may not realise you’ve moved track regions away from the same start position. Keep good notes!
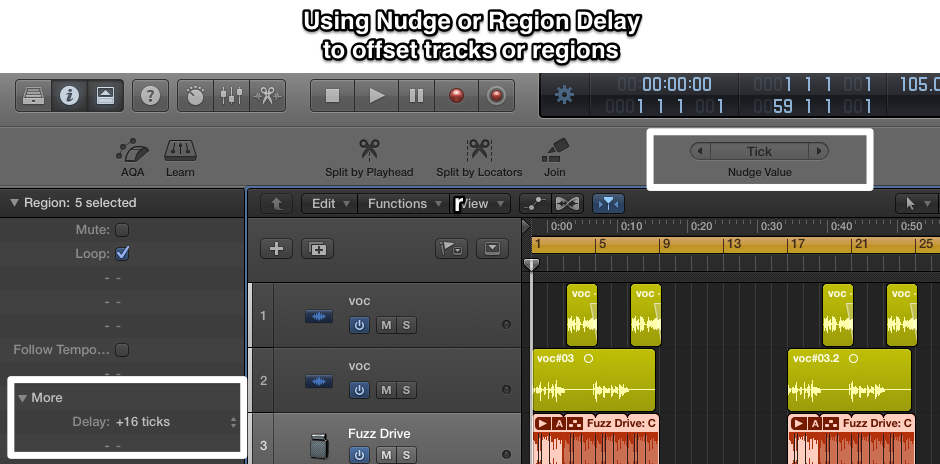
Region Delay in Logic Pro
In the region inspector (under “more”) there is a parameter for Delay. You can set it earlier (- values) or later (+ values). The handy thing about this way of doing it is that you can split each track into different regions for chorus/verse etc, which can each have a different delay value.
Using delays. This is the old-school way of doing it. Insert a delay plug-in (with the same delay value eg 500ms) on every track. If you want to make a track play earlier – lower the delay for that track. If you want it later – make the delay longer. The beauty of this method is that it automatically keeps a record of what you’ve done by saving the plugin settings.
*Phase problems. Watch out for this. Once you get down to a few samples difference between different microphones on the same instrument (eg the drum kit), you’re potentially going to get phase issues. Sometimes even a few samples can make a difference. The wavelength of around 2cm (almost an inch) is 13.5kHz, so that means moving the microphone “virtually” even that much can make a big difference. This is where phase “rotation” plugins can be handy – such as UAD’s Little Labs IBP Phase Alignment Tool.