This latest Logic Pro X update doesn’t have a heap of new items – it’s mostly just (always welcome) bug fixes plus a few subtle but quite powerful tweaks.
SOUND LIBRARY RELOCATION
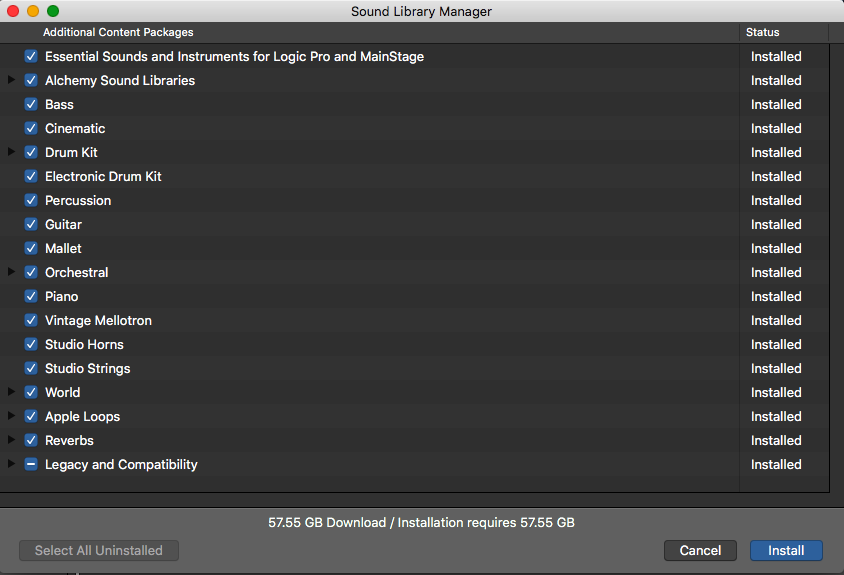
Probably the biggest yet simplest one is the ability to move Logic’s huuuuge Sound Library elsewhere. You’ll still need some space on your main drive as it caches the downloads before moving them. This must be one of the biggest demands from users over recent years, what with shrinking drive sizes on laptops (expensive SSDs mainly) and the ever-expanding Sound Library. I just looked and it’s currently about 57GB with all the legacy stuff included.
Relocate Sound Library Menu
Sound Library Browser
SMART TEMPO ENHANCEMENTS
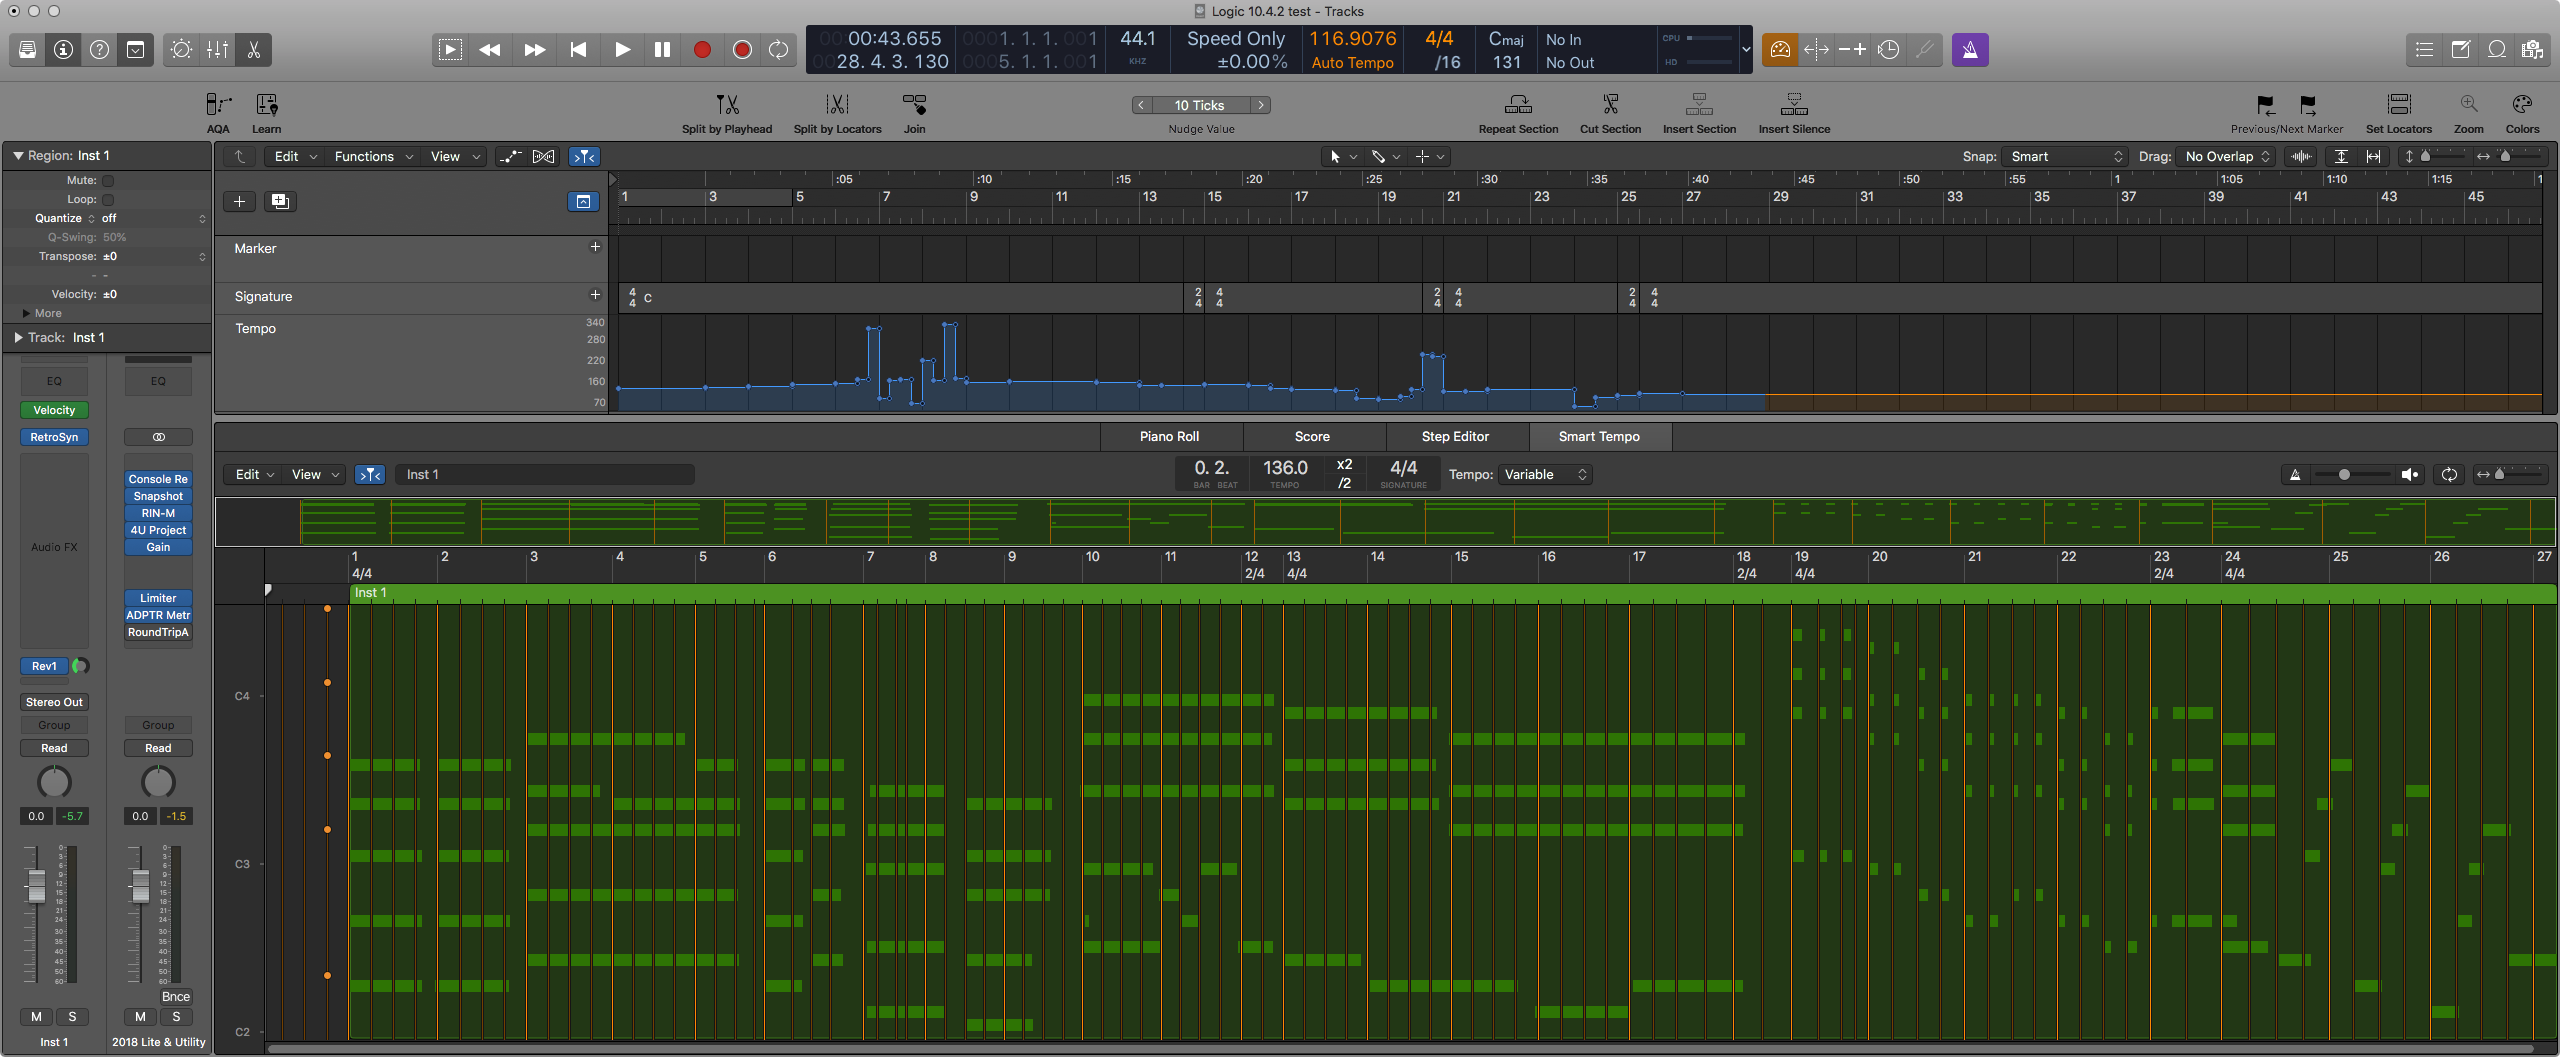
The most complex addition is probably the bunch of new features in Smart Tempo. Now you can detect tempo across multi-track audio files – no doubt very handy for importing full studio recording projects from elsewhere. You can even select which files will be analysed for the resulting tempo calculation. The (newly-renamed) Smart Tempo editor allows you to edit each individual audio track detection or a combined down-mix file.
You can also analyse and edit Logic’s tempo and time signatures based on MIDI regions that weren’t played to a click track.
Logic Pro Tempo detection from MIDI Region
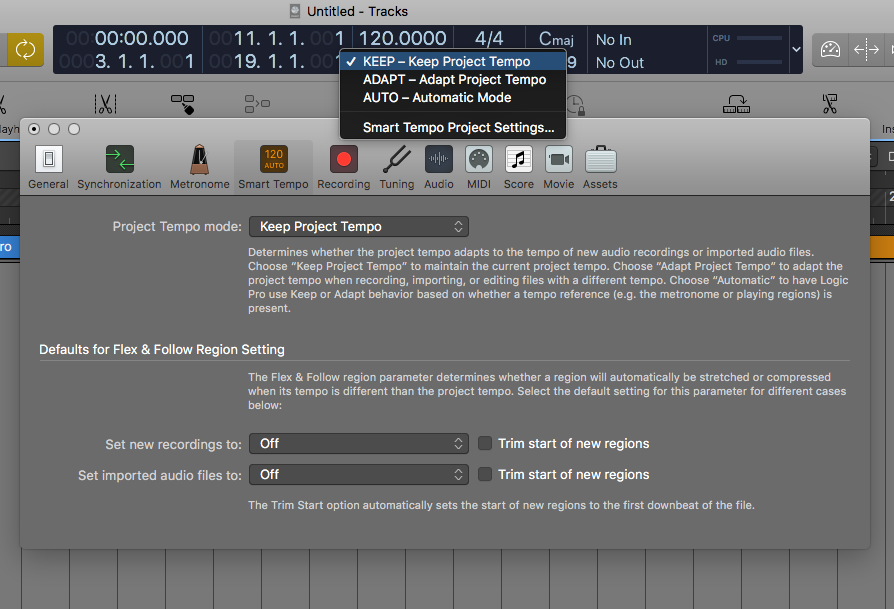
Plus it looks like there’s also some extra options on the Project Settings/Smart Tempo pane that allow auto creation of edit groups on import and some options for exporting tempo.
Smart Tempo Project Settings
AUX SEND ENHANCEMENTS
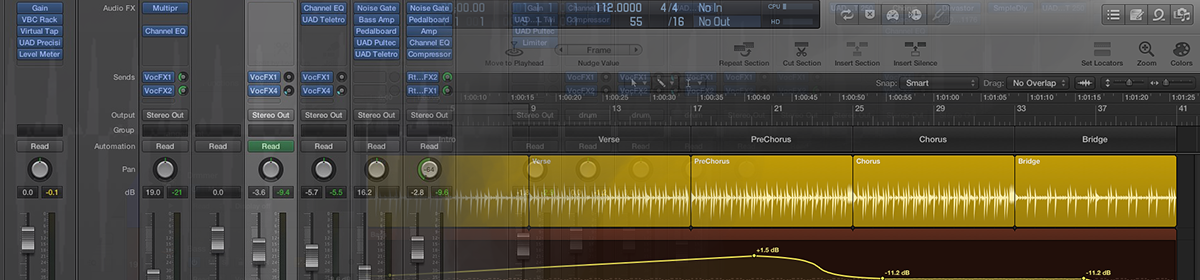
For those that do a lot of recording and mixing in Logic – Apple have added some awesome Aux-send capabilities.
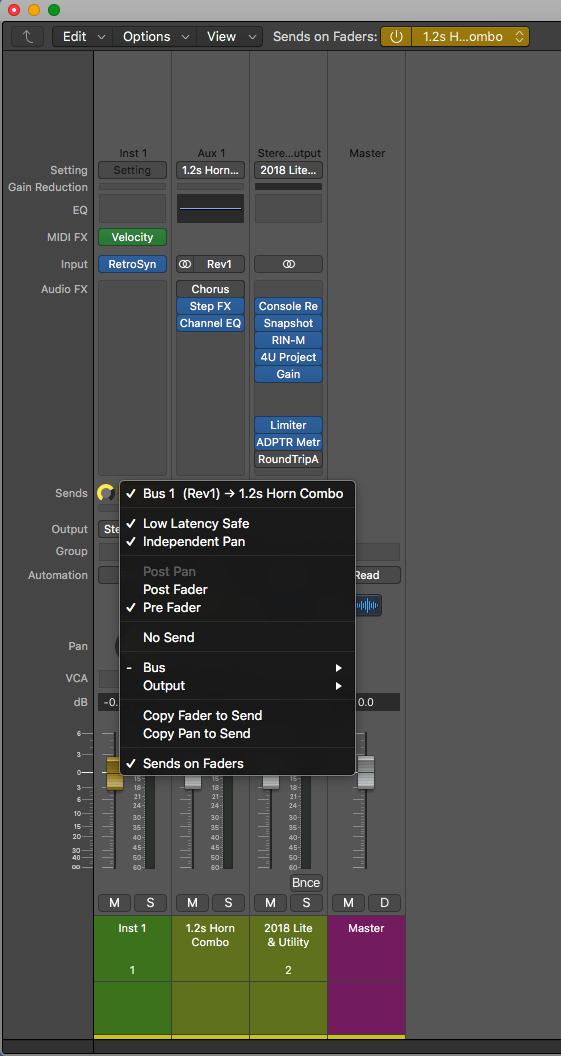
Firstly, the ability to directly create an aux send to an output without having to go through a bus. This is perfect for creating headphone sends.
You can even use a menu command to match the channel-strip’s current fader and pan positions to the send – again a fairly normal way of starting off a headphone mix. On a related note – you can now have an independent pan for each send. Again this is perfect for headphone sends, but also useful when sending to stereo effects where you want to go into one specific side. You could always control this to some extent by making the aux send post-pan, but this would just follow the channel-strip pan. The actual control of the new Independent Pan can only be done when you enable the mixer’s new Sends to Faders mode. There’s a new button/selector at the top of the mixer just for this.
Logic New Aux Send Features
What this mode also does is make the Channel Fader control the selected Aux Send, and the Channel Pan control the selected Aux Send pan.
This means a couple of things; You can now use the Fader (or a connected control surface fader) to control an Aux send level accurately, and with the panning you can do cool stuff like pan the Channel strip left and the the Aux Send right and potentially get some fancy stereo stuff going on. I just tried it with Step FX and it was quite cool.
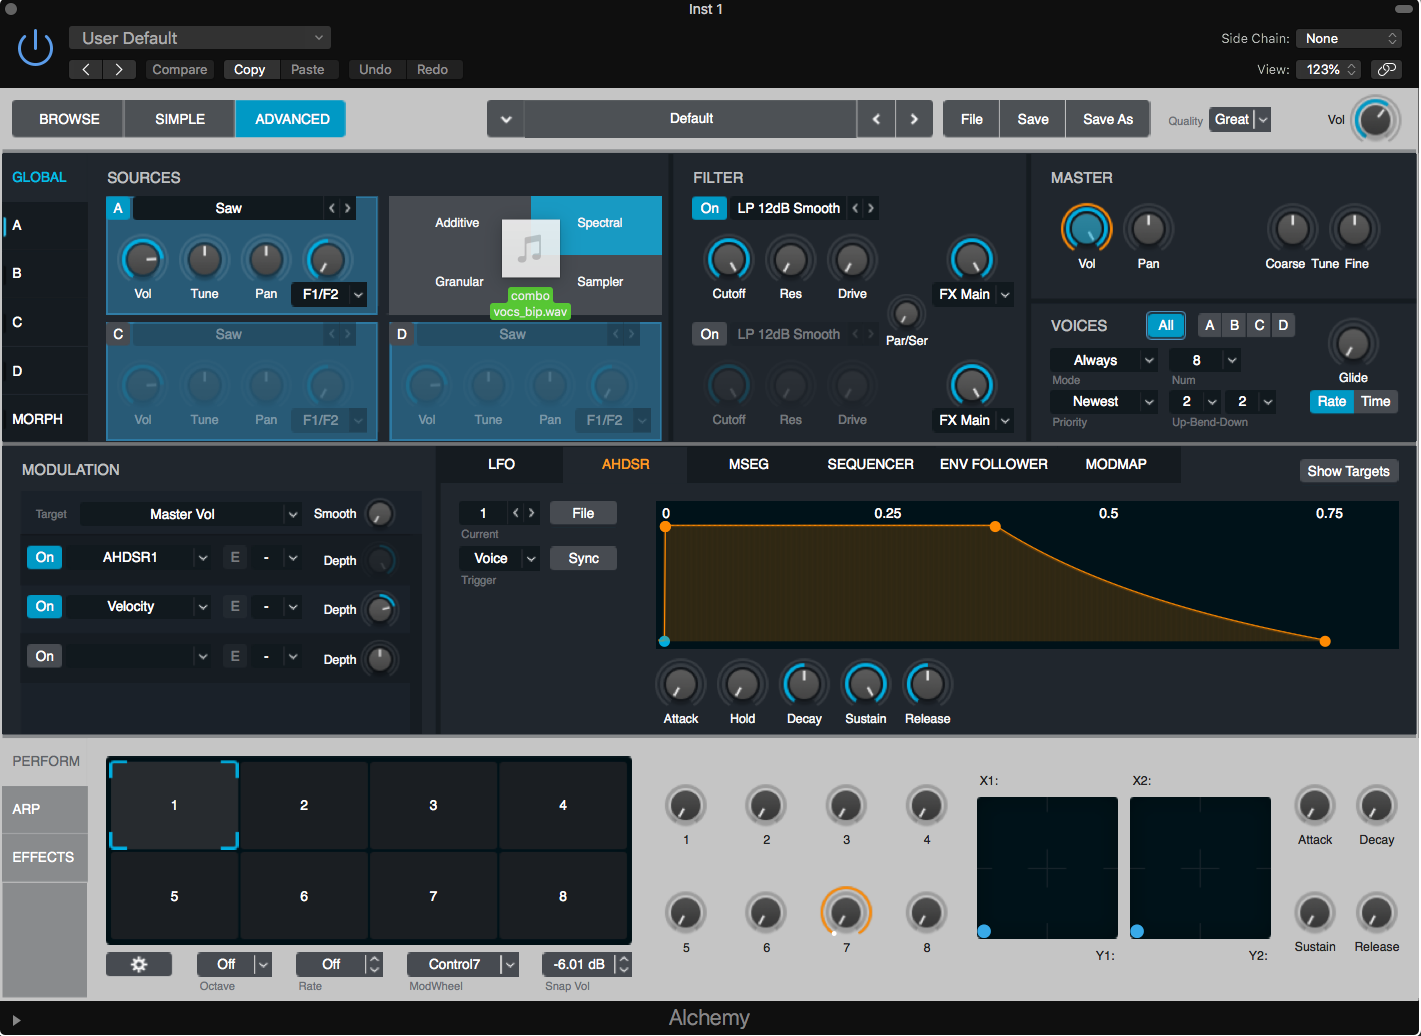
ALCHEMY HOTSPOTS
As usual, Alchemy got some more love this time around. You can now drag audio files directly onto a Sources panel and each contains hotspots for Additive, Granular, Spectral and Sampler import.
Alchemy Drag and Drop Hotspots
So all in all some cool stuff. See the Release Notes for the full picture.
My friend sent me a text that woke me up that simply said. “10.4!!!!”. Of course I instantly knew that he meant a new release of Logic Pro X.
I always love a new Logic release – it’s like my birthday! What new toys are there to play with? Then my engineering brain steps in and it’s all “what new functions are there to improve my workflow?” . Boring.
And then I struck my first problem – I couldn’t even see the Logic update in the App Store. Maybe Apple were doing a staggered notification to ease the server load? “Zed” is probably last on the list. Nope. A bit of searching revealed that you need at least macOS Sierra to install this version of Logic. I should have twigged as this same issue came up recently with latest FCP-X version as well (which I ignored). I have been sitting on OSX El Capitan due to some requirements with my official place of employment and also due to learning to avoid the bleeding edge by changing an OS during projects. Projects never seem to end as they all overlap. Solution – install macOS Sierra onto another boot drive and keep El Capitan just in case.
So that was a good chunk of a day gone after having numerous extra updates, scanning all my old third-party plug-ins again, fixing the broken ones, and downloading all the extra gigabytes of Logic Pro X content. But we got there in the end, and finally I could open up the new Logic Pro X version 10.4 .
Hurrah! By the way – in case you never noticed, Logic always comes with a demo project – this time it’s Beck’s Colors. It’s nice to open something first that only uses Logic plugins so there’s no weird issues.
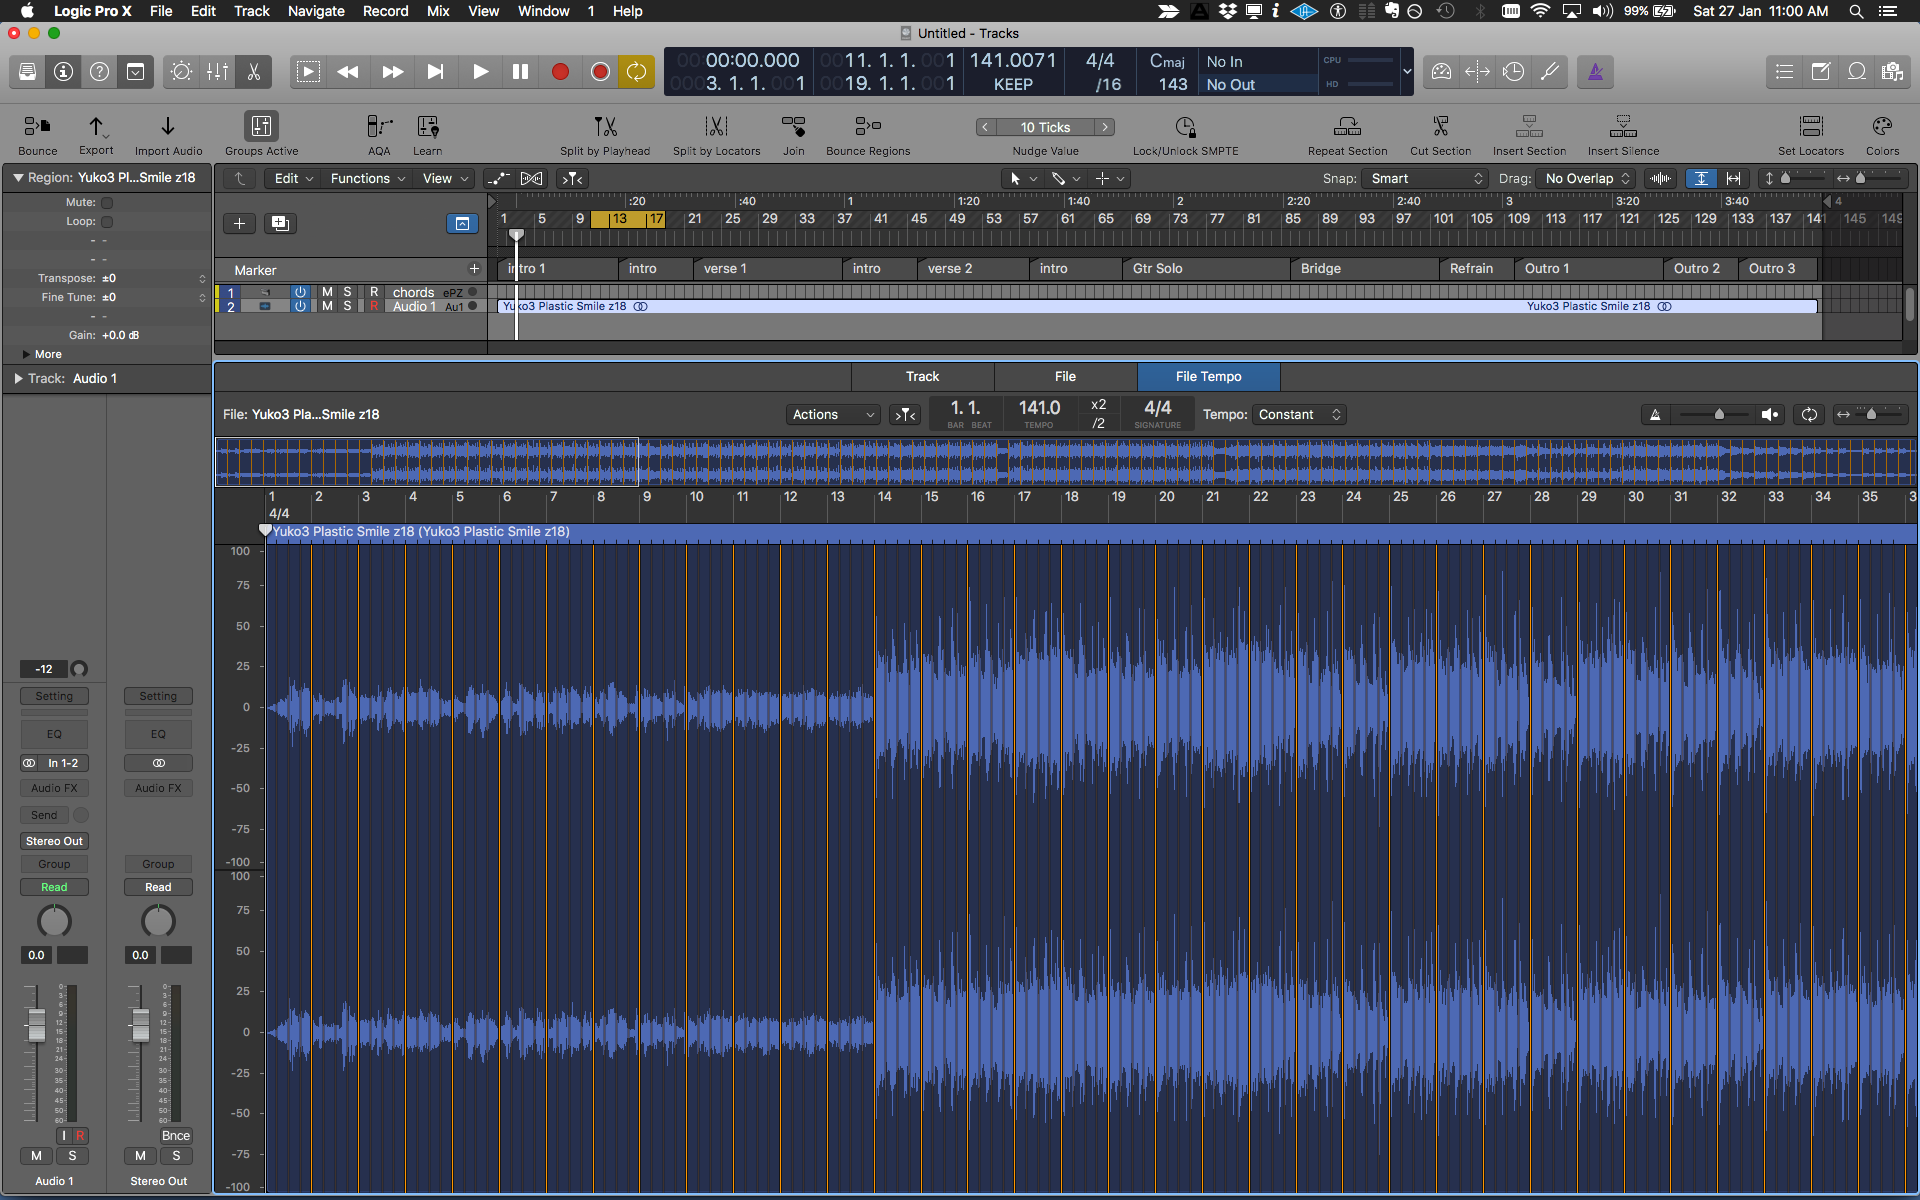
Tempo-Matching
As a relatively major update, Logic has added several major improvements. Probably the biggest is the new tempo-matching feature. This feature makes it a lot simpler to bring together audio files of different tempos into the same project, or you can do things like easily match imported files to a track played without using a metronome. There’s been the ability to do this sort of thing in Logic previously by combining tools such as Flex time, detect Tempo and Beat Mapping but it was often intricate and fiddly. Apple have unified these things as a kind of simplified macro system – just like they did with the old “Replace or Double drum track” feature.
Tempo Matching Controls and Project SettingsFile Tempo Edit Tab
Tempo-matching features are embedded into the entire Logic Pro X application – in the top display/tool bar, in the Project Settings, and there’s a whole new File Tempo edit tab just for tweaking detection and how you want Logic to behave regarding it. It’s a complex feature that I’m going to experiment with and might do a full article on later.
There’s also a bunch of new plug-ins and instruments.
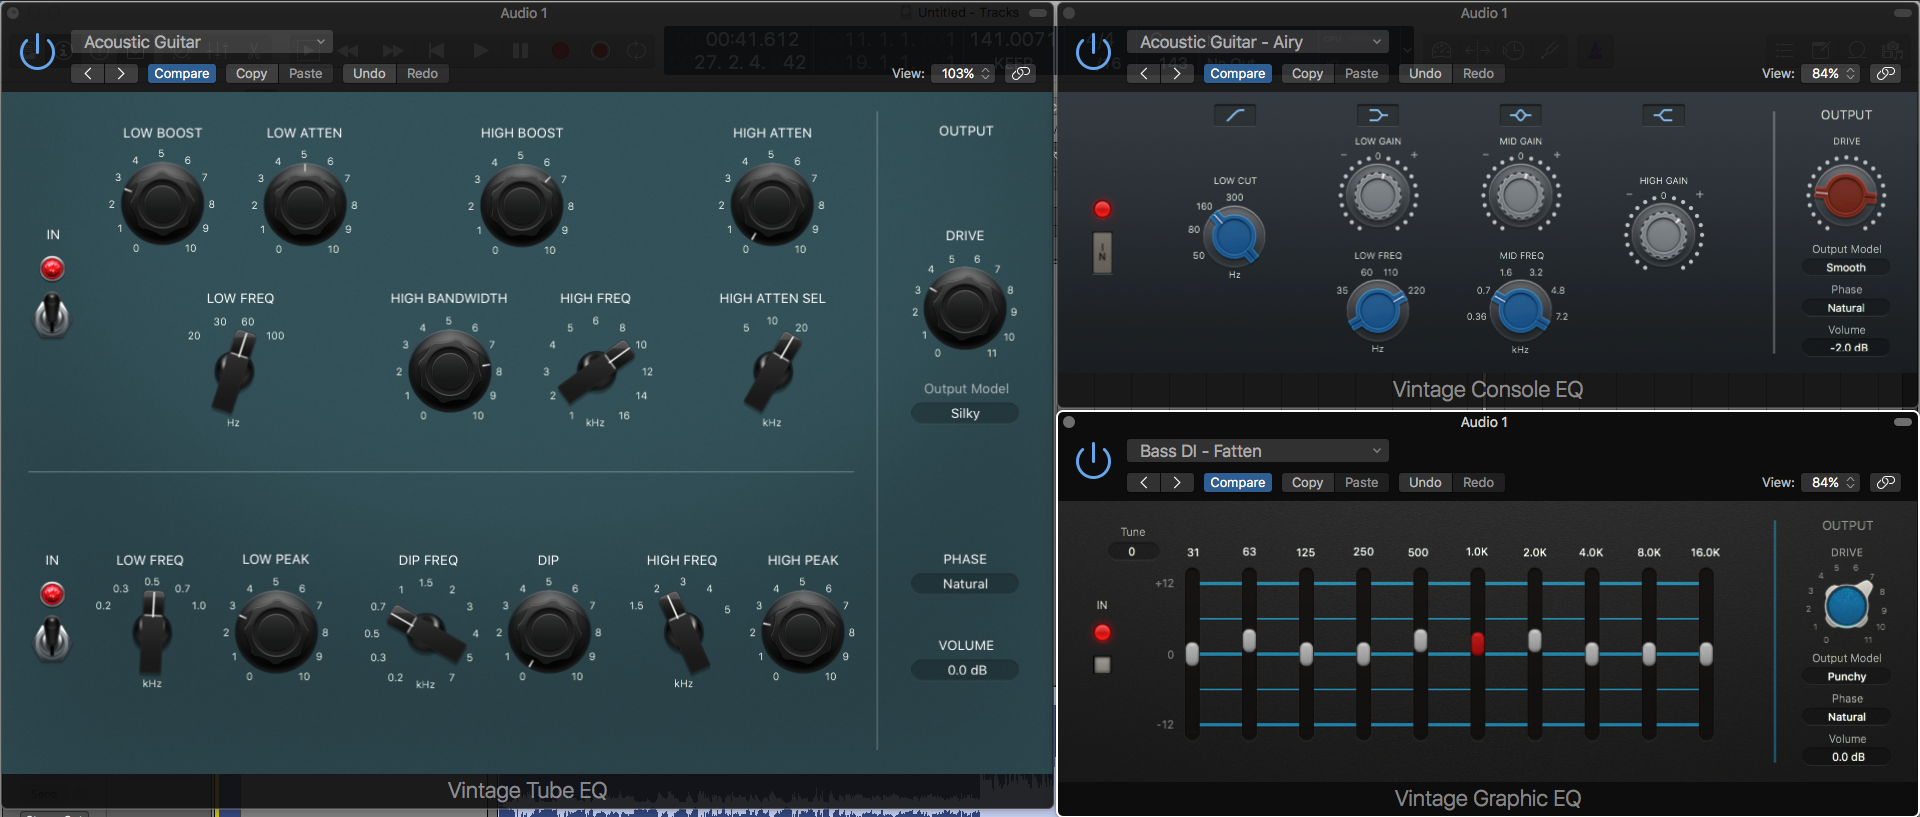
EQ
Vintage EQs
Three essential models of vintage EQs are included – Vintage Tube EQ (a Pultec clone), Vintage Graphic EQ (an API clone) and Vintage Console EQ (a Neve clone). They sound pretty nice at first listen (each has several options for tweaking coloration of sound including a linear phase mode) but I’ll need to do a bit of a test against some other modelled EQ plugins of the same type before I can really tell how good they are. Pretty darn cool to have these included in Logic Pro – now there’s finally something to match the vintage compressor models.
Reverb
Reverbs have had a bit of shake-up this time around, with the poor old PlatinumVerb being relegated to Legacy bin (BTW all the old legacy plugins are still available in Logic by hitting Option then clicking on a plug-in slot).
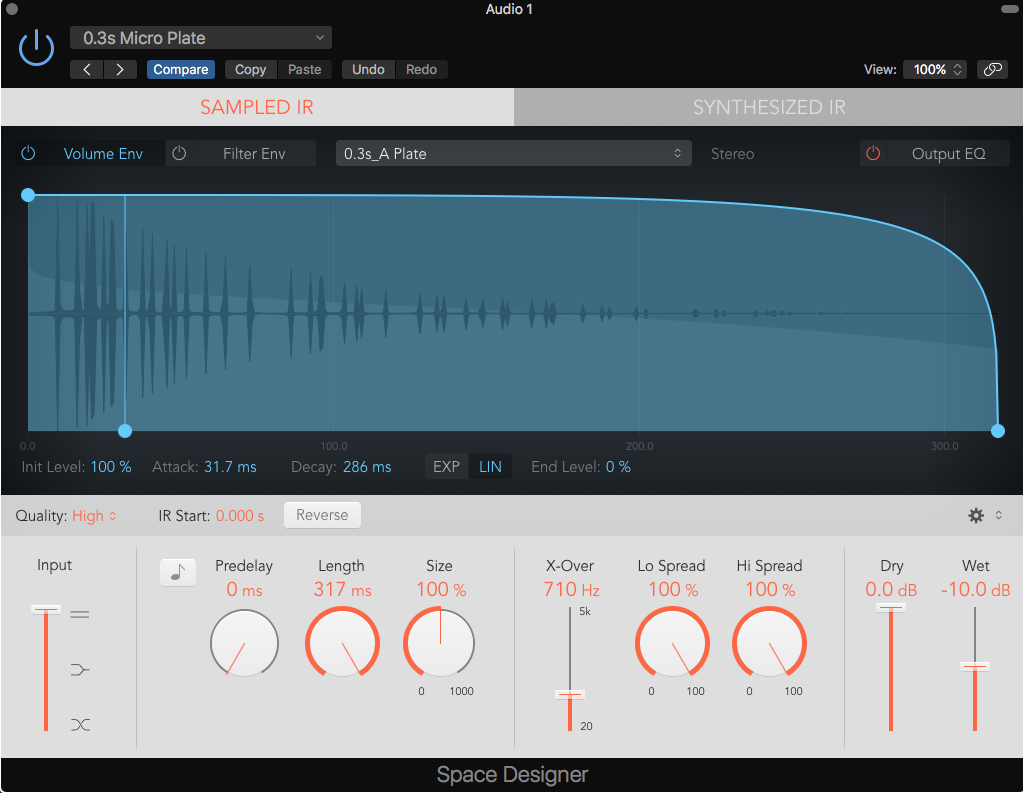
Space Designerhas a had a facelift – a brand new “flat” interface that looks quite tidy. Otherwise much the same as it was before.
New Space Designer Interface
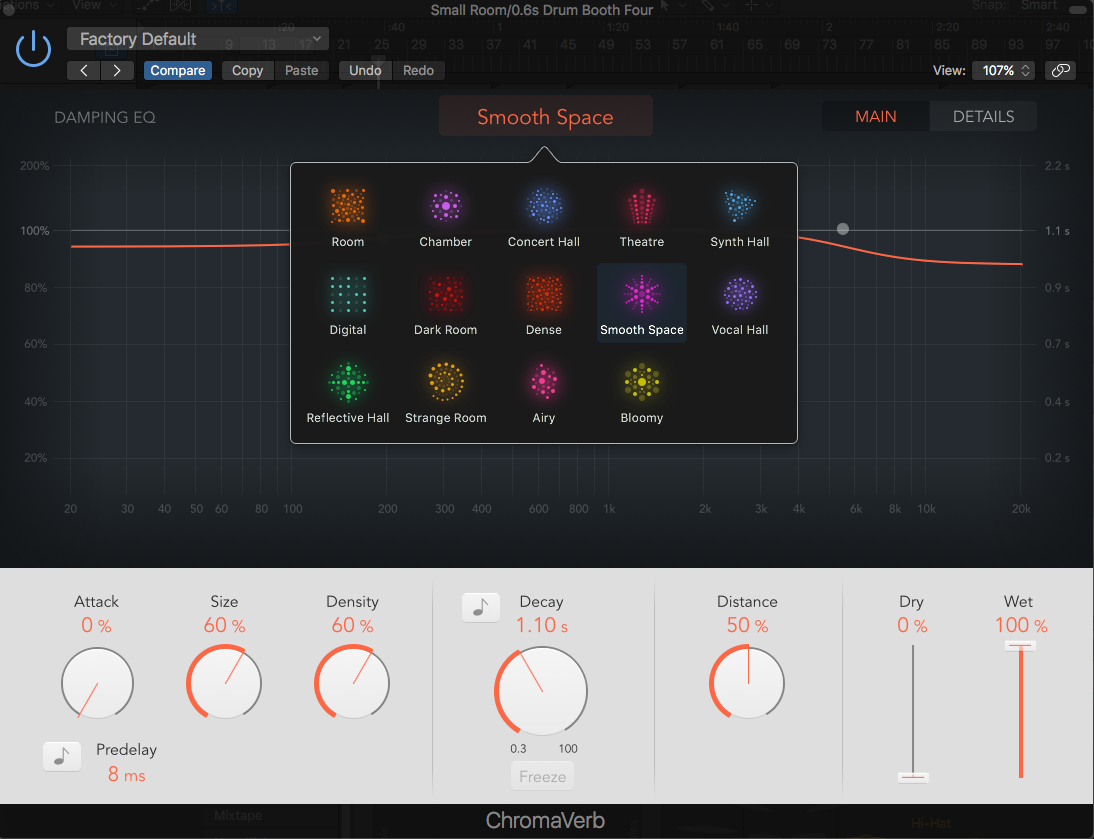
The new kid on the reverb block is ChromaVerb. This has 14 different tweak-able reverb algorithms and it sounds pretty good – especially if you switch the quality to “Ultra” mode. It’s good to see it has some cool musical features like beat-sync-able pre-delay and decay settings. Plus a slider to mono-ise the low end of the reverb. Lots of EQ and even a damping EQ to tailor the reverb decay at different frequencies.
ChromaVerb Interface
It’s also meant to have a cool real-time visualization of the reverb but it doesn’t work on my old laptop. Sad face.
Multi Effects
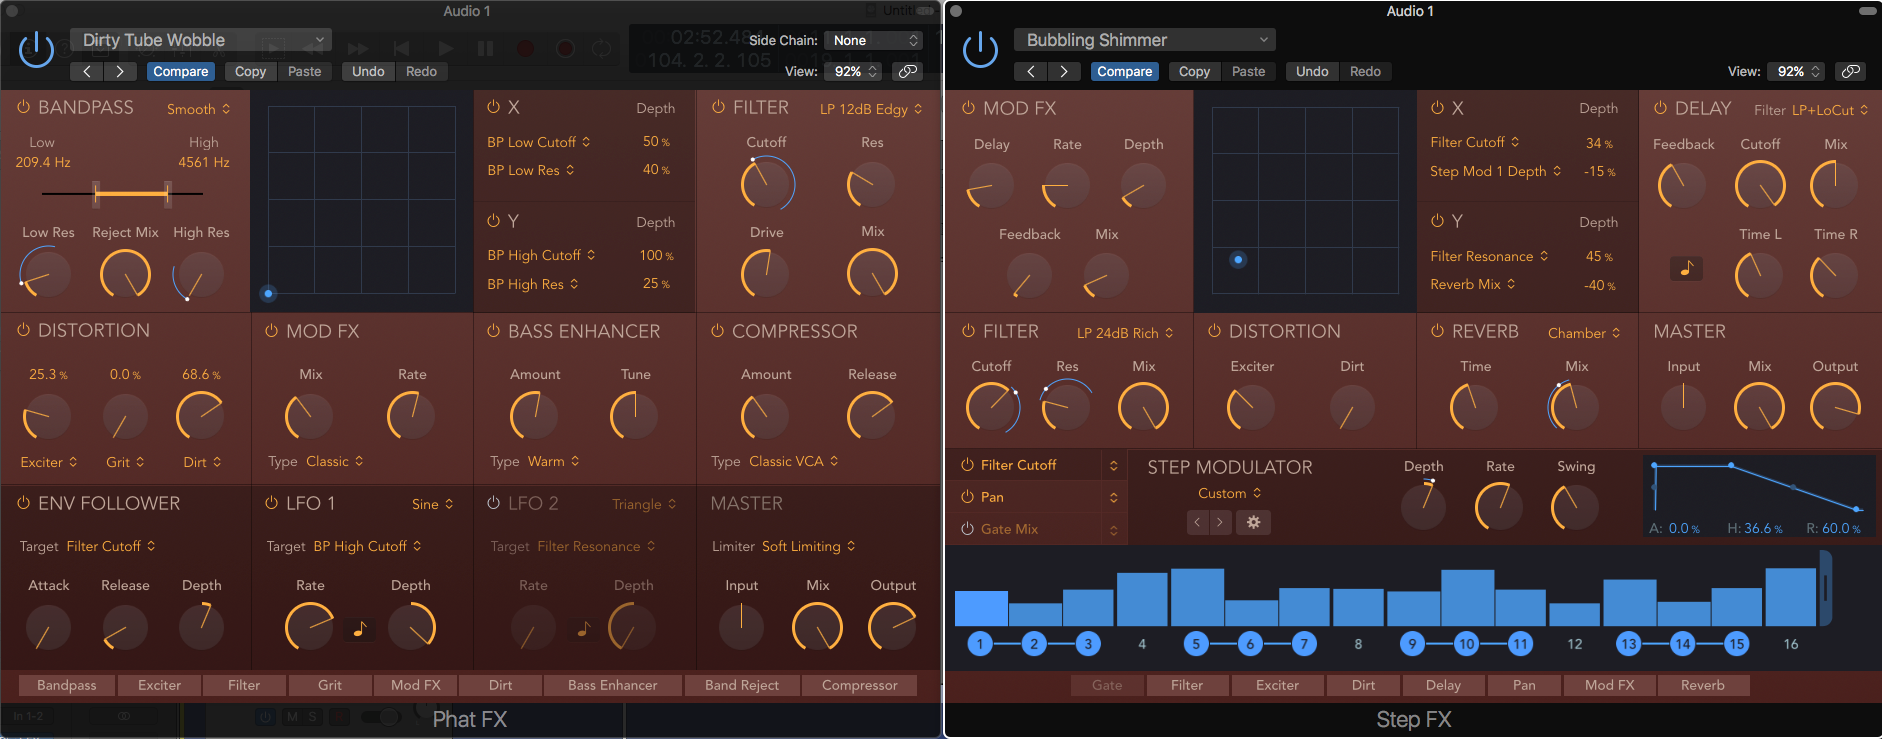
There’s a new category of plugin called Multi Effects which has two new plugins: Phat FX and Step FX. These, as you can probably guess, are combinations of various types of effects within the same unit. Phat FX has combinations of filters, compression, distortion, enhancers and the like, while Step FX biases towards delays, reverbs, filters and modulation effects.
Multi Effects Phat FX and Step FX
The Step FX also has a built-in step editor so you can get some groove-based effects going on. A quick browse through the patches shows that there’s some cool and wild sounds from both of these plug-ins. Could be quite inspiring.
Instruments
Apart from adding the usual slew of extra features to Alchemy, plus a bunch of extra filters to Retro Synth (these are actually pretty cool), there’s a bit of “re-bundling” been going on. As usual with Apple there’s always some added-value when this happens.
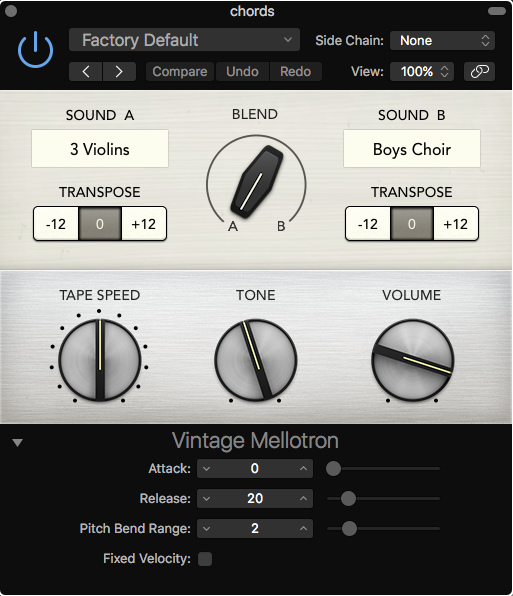
For example, the Mellotron patches have now been bundled into a new instrument called Vintage Mellotron. It has some cool extra features too. You can blend between two different sample patches and there’s octave buttons for each patch and some control over the sound quality with tape speed and tone controls.
Vintage Mellotron Instrument
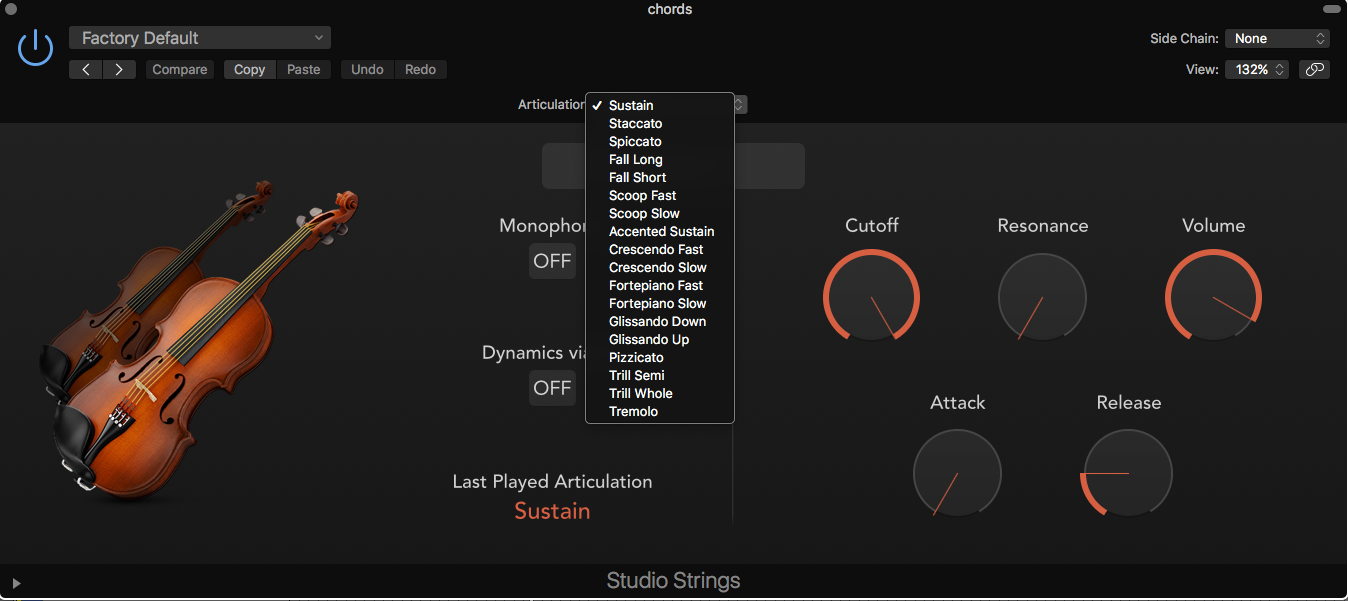
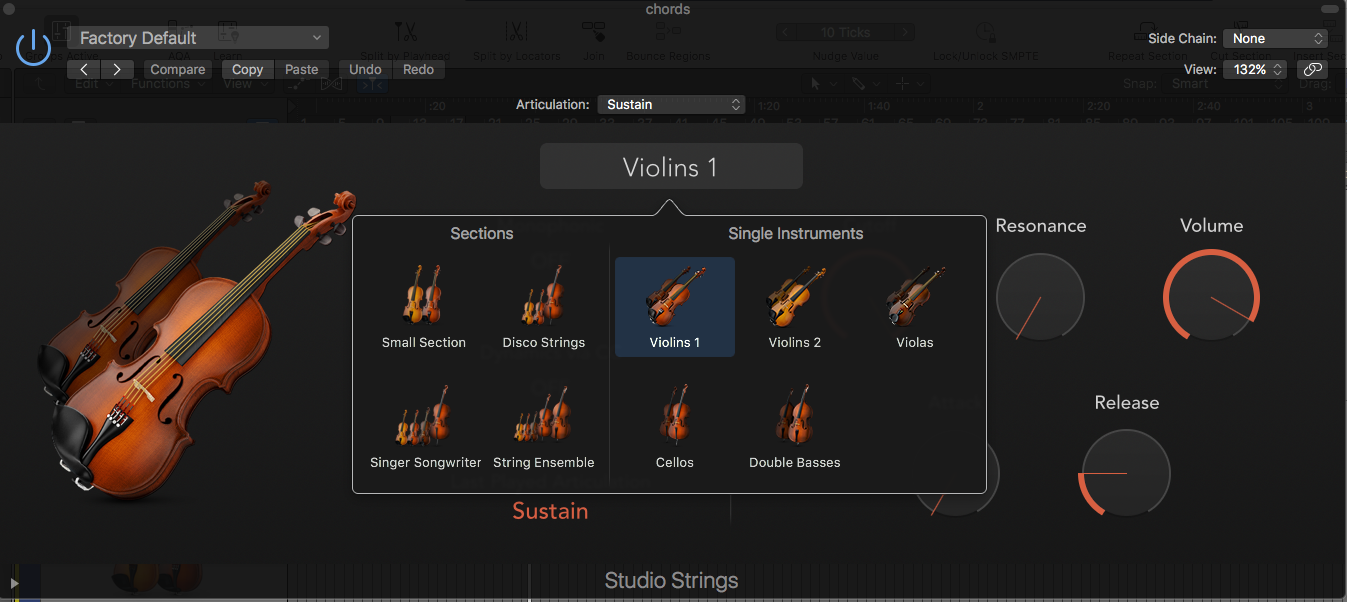
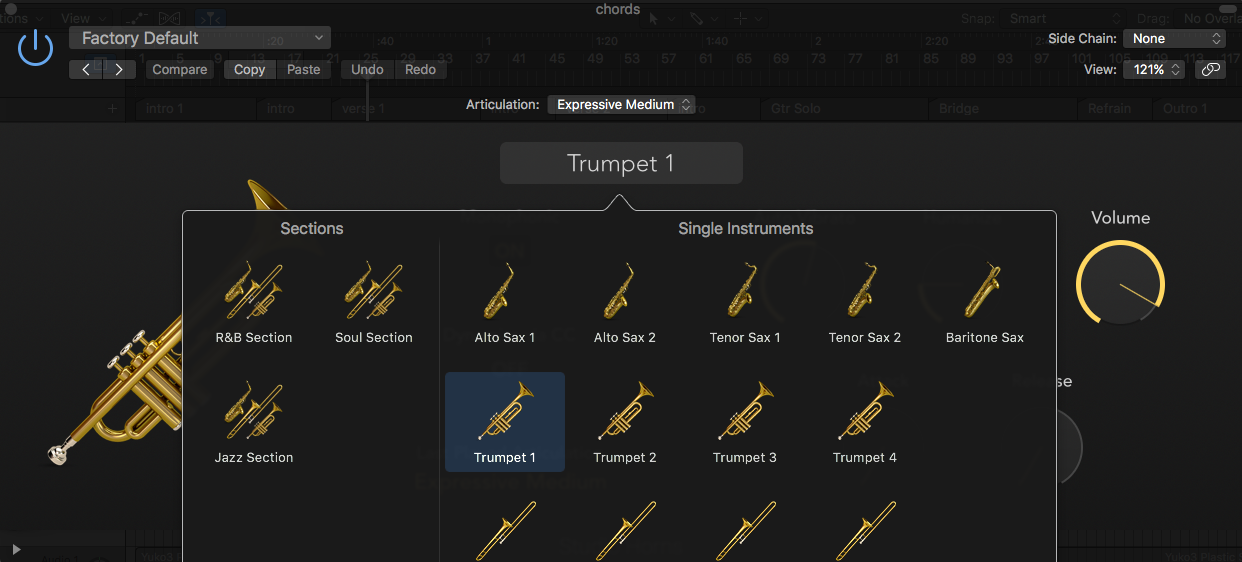
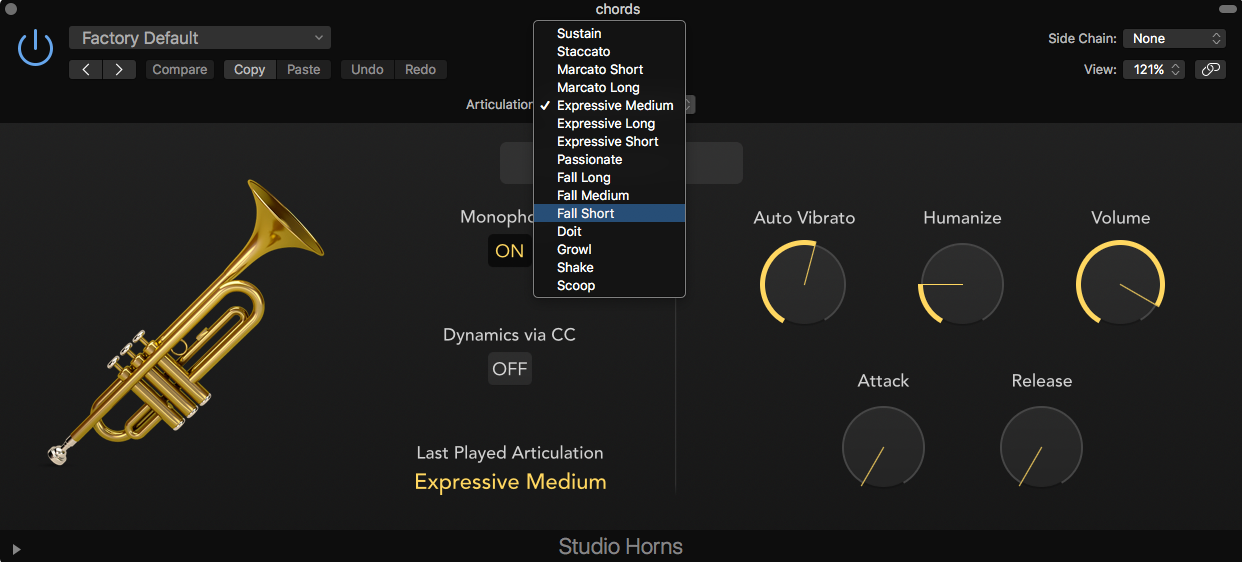
Studio Horns and Studio Strings
Another re-bundled pair of EXS-24 sets of Brass and Strings patches, these two are so much better than you’d imagine. Actually they’re my favourite thing right now. Not only have they improved and expanded the number of the recorded samples, you can play while dynamically switching between articulations (eg Sustain, Staccato, Pizzicato, Drops, Trills etc playing styles). The cool thing about the Articulation attribute is that it is attached to a MIDI note, so any note can be switched between any available articulation, giving great control over phrasing.
Editing a recorded Articulation is simple – where you could only do it in the Event List editor, now you can do it in the Piano Roll editor which has been given an extra Articulation selector (if Articulation is detected).
By the way – you need to select an articulation set in the Track Inspector first. Took me about half an hour to work that out.
Apple has really spent some time thinking about Articulations and have upgraded and standardized their implementation of Articulations within Logic. You can apparently customise the mapping of articulations to work with third-party instruments, although I haven’t explored that aspect yet.
Other Stuff
There’s a huge bunch of bug-fixes and enhancements. Check out the full release notes HERE if you’re interested. But here’s a few other highlights:
Marquee tool pop-up shows the length of selection. Finally! Yes!
You can normalize the gain of selected audio clips to either peak or loudness targets – including -23LUFS.
Two new drummers (Austin and Tyrell) with brush-based kits. No reggae beats yet, Apple? C’mon.
You can now choose to undo mixer and plug-in changes.
There’s some major changes to MIDI draw in the Piano Roll – this is now integrated with the Automation system. More on this in another post.
Heaps of new Apple Loops (The new brush-based Drummer loops, Future Bass, Reggaeton Pop)
You can now link plug-ins in “multi” link mode so that when you select another track it’ll show all multi-selected plug-ins for that track.
“Visions” Cinematic presets for Alchemy.
Untagged Loops browsing in Apple Loops browser (ie just regular audio loops from CDs and stuff without the Apple Loop metadata added.)
Improved grouping functions and VCA fadering.
You can bookmark other locations in the File Browser (Yuss!)
The Direction Mixer plug-in now includes a crossover.
It looks like mostly awaited bug-fixes for the previous big v10.3 update (there were a few niggles with the new Track Alternative functions amongst other things), but also adds updated Audio Unit v3 compatibility.
One of the cool tricks you can do with Logic’s Drummer regions is to drag out an alias of the Drummer region to another software instrument track. (Drag a Drummer region with mouse while holding Shift-Option). Aliases are virtual regions with no content of their own – they just follow another region’s content (although you … Continue reading “Using aliases with Logic X’s Drummer to layer kick and snare tracks”
One of the cool tricks you can do with Logic’s Drummer regions is to drag out an alias of the Drummer region to another software instrument track. (Drag a Drummer region with mouse while holding Shift-Option).
Aliases are virtual regions with no content of their own – they just follow another region’s content (although you can still do stuff to them like transpose them etc).
Shift-Option drag Drummer region to create an alias
This new software instrument track can be another Drum Kit instrument, or a Drum Machine, sampler or even a third-party drum instrument like Slate’s SSD drum sampler.
Now your new instrument track (via the alias) will play exactly the same thing as the Drummer pattern. Even if you go back and tweak Drummer the alias will still follow it. And if you mute the Drummer region, the alias still works, and you will continue to hear the Drummer pattern through your new drum instrument.
That’s pretty cool, but what if you don’t want to layer the entire kit – perhaps just the kick or the snare?
That’s easily done too;
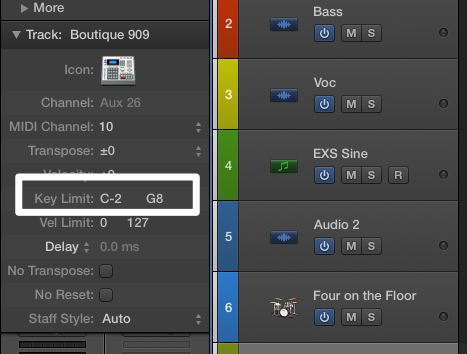
On the new alias instrument track, go to its Track Inspector pane. It’s the second box down in the Inspector window on the left. It’s usually hidden, so you might have to click the little disclosure triangle to pop it down.
Now you should see a “Key Limit” line, with something like “C-2 G8” in it. These are the low and high key limits, and it means that this track will currently accept MIDI notes over the full range of possible MIDI notes from C-2 up to G8.
Set the track’s Key Limit range down to a single note – eg C1 for Kick drum, or D1 for Snare
If you only want to trigger the kick, double click the “C-2 G8” and type in “C1”. You should see two C1’s – meaning only this one MIDI note will now be accepted. You should only hear the kick drum.
And if you want a layered snare as well?
With the same instrument; Create another Virtual Track going to the same instrument; Menu: Track/Other/New with Same Channel
Drag a copy of the alias to this track. (Option-drag alias with mouse)
On this track, double click the Key Limit numbers and type in “D1”. This will now only accept the snare MIDI note.
With another instrument; Create another software instrument track and dial up a drum patch.
Drag a copy of the alias to this track. (Option-drag with mouse)
On this track, double click the Key Limit numbers and type in “D1”. This will now only accept the snare MIDI note.
As you’ve probably figured out by now, you can carry on and layer as many extra kicks and snares on different drum instruments as you feel like.
Bonus tip for handy kick and snare layers:
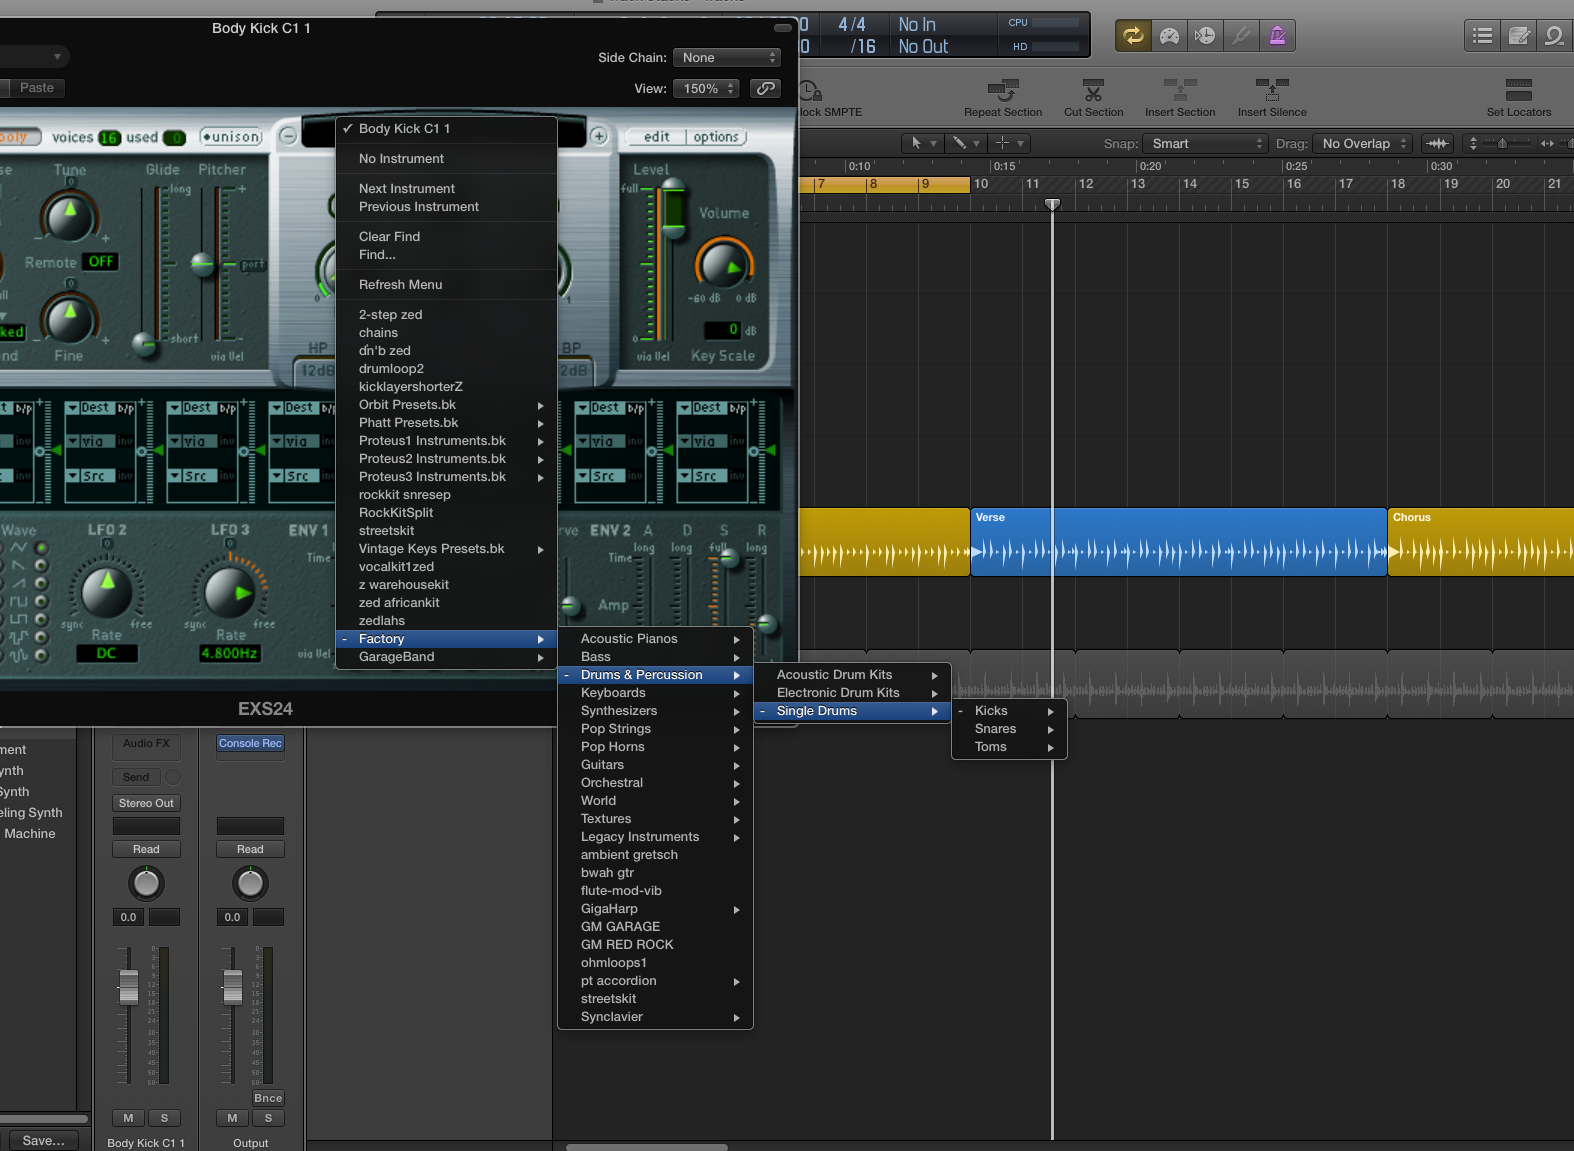
Load up an instance of an EXS24 in a new instrument track. (In the Patch Library select Legacy/Logic/Logic Instruments/EXS24)
Click the EXS24 slot on the channel strip to open the EXS24 front panel up.
EXS24 Kick Drum Layer Samples
In the little panel above the Cutoff Knob, click and select Factory/Drums & Percussion/Single Drums/Kicks/Layer Kicks/Body Kick C1 1. If you click the little “+” symbol to the right of the panel you can step through each sample in turn.
As you can see there’s a whole bunch of “body” and “transient” kicks (and snares) that can be used to layer your existing kicks (and snares). Some of these sound great, although the “body” kicks sound unusual by themselves as they’ve had the transient part trimmed off the front.
Drag your Drummer alias onto one of these EXS24 tracks and set the Key Limits for the track as explained above and you’re away laughing.
One of the cool things you can do so easily in a DAW (Digital Audio Workstation) is slip entire tracks, or actually the regions within it, to the left (earlier in time) or to the right (later in time). What’s so cool about this? There’s a couple of things you can do with it. 1. … Continue reading “Tighten up your mix by using track-offsets”
One of the cool things you can do so easily in a DAW (Digital Audio Workstation) is slip entire tracks, or actually the regions within it, to the left (earlier in time) or to the right (later in time).
What’s so cool about this?
There’s a couple of things you can do with it.
1. Correcting Microphone Delays
One fairly obvious example is tightening up drum kits. It’s pretty common to use room mics when recording a drum kit. Let’s say your room mics are 3m (9.8feet) from the snare mic on the kit. That’s about an extra 8 milliseconds, or (@44.1kHz sample rate) 353 samples.
If you slid your room mic regions 8ms/353 samples to the left, the recorded signal would coincide perfectly with the snare mic – ie there would be no delay between the mics.* Note that you’ll need to have all your tracks starting a little bit later than 0′:00″ or Bar 1 so you have some “left” to go to.
You don’t have to pull the room mics all the way back though – you might just want to pull them a bit closer in time to tighten up the room sound.
2. Creating a Pocket/Helping the groove
This is where you can subtly shift the timing of regions to help the overall groove of the track.
For example, many bass players get a little excited when recording, and can play a little ahead of, or right on top of the drum beat. Although it’s still “in time”, sometimes delaying the bass very slightly can make it “groove” more with the drums.
In this case you would incrementally slip the bass region/s to the right until the groove feels better. The kick drum often masks the attack of the bass to a certain extent, so it can also clean up the kick/bass combination.
It can help to think of being “in-time” as a window rather than a vertical line, and you can be at one edge or the other of that window and still be in time, but get some huge changes in “feel”.
How to do it
There’s a couple of methods.
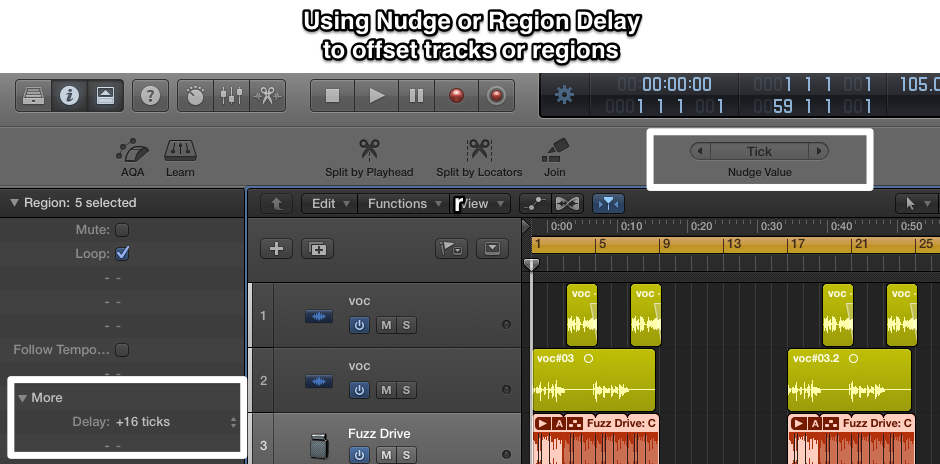
Shifting the actual region itself using “nudge”. In Logic or Pro Tools you can incrementally bump something in either direction by using the nudge keys. You can set the nudge value to pretty much anything -samples, beats etc. The dangers of this method are if you give the files to someone else to mix they may not realise you’ve moved track regions away from the same start position. Keep good notes!
Region Delay in Logic Pro
In the region inspector (under “more”) there is a parameter for Delay. You can set it earlier (- values) or later (+ values). The handy thing about this way of doing it is that you can split each track into different regions for chorus/verse etc, which can each have a different delay value.
Using delays. This is the old-school way of doing it. Insert a delay plug-in (with the same delay value eg 500ms) on every track. If you want to make a track play earlier – lower the delay for that track. If you want it later – make the delay longer. The beauty of this method is that it automatically keeps a record of what you’ve done by saving the plugin settings.
*Phase problems. Watch out for this. Once you get down to a few samples difference between different microphones on the same instrument (eg the drum kit), you’re potentially going to get phase issues. Sometimes even a few samples can make a difference. The wavelength of around 2cm (almost an inch) is 13.5kHz, so that means moving the microphone “virtually” even that much can make a big difference. This is where phase “rotation” plugins can be handy – such as UAD’s Little Labs IBP Phase Alignment Tool.