Logic Pro X update v10.4 released – with some cool new features

My friend sent me a text that woke me up that simply said. “10.4!!!!”. Of course I instantly knew that he meant a new release of Logic Pro X.

I always love a new Logic release – it’s like my birthday! What new toys are there to play with? Then my engineering brain steps in and it’s all “what new functions are there to improve my workflow?” . Boring.

And then I struck my first problem – I couldn’t even see the Logic update in the App Store. Maybe Apple were doing a staggered notification to ease the server load? “Zed” is probably last on the list. Nope. A bit of searching revealed that you need at least macOS Sierra to install this version of Logic. I should have twigged as this same issue came up recently with latest FCP-X version as well (which I ignored). I have been sitting on OSX El Capitan due to some requirements with my official place of employment and also due to learning to avoid the bleeding edge by changing an OS during projects. Projects never seem to end as they all overlap. Solution – install macOS Sierra onto another boot drive and keep El Capitan just in case.

So that was a good chunk of a day gone after having numerous extra updates, scanning all my old third-party plug-ins again, fixing the broken ones, and downloading all the extra gigabytes of Logic Pro X content. But we got there in the end, and finally I could open up the new Logic Pro X version 10.4 .

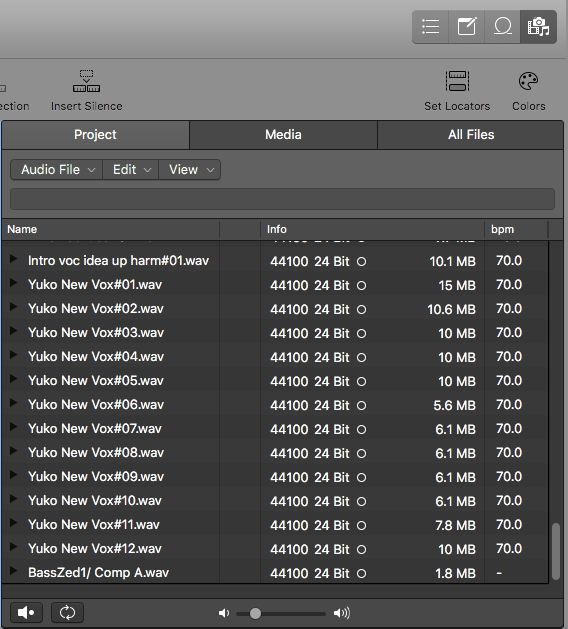
Hurrah! By the way – in case you never noticed, Logic always comes with a demo project – this time it’s Beck’s Colors. It’s nice to open something first that only uses Logic plugins so there’s no weird issues.

Tempo-Matching

As a relatively major update, Logic has added several major improvements. Probably the biggest is the new tempo-matching feature. This feature makes it a lot simpler to bring together audio files of different tempos into the same project, or you can do things like easily match imported files to a track played without using a metronome. There’s been the ability to do this sort of thing in Logic previously by combining tools such as Flex time, detect Tempo and Beat Mapping but it was often intricate and fiddly. Apple have unified these things as a kind of simplified macro system – just like they did with the old “Replace or Double drum track” feature.

Tempo Matching Controls and Project Settings
File Tempo Edit Tab
File Tempo Edit Tab

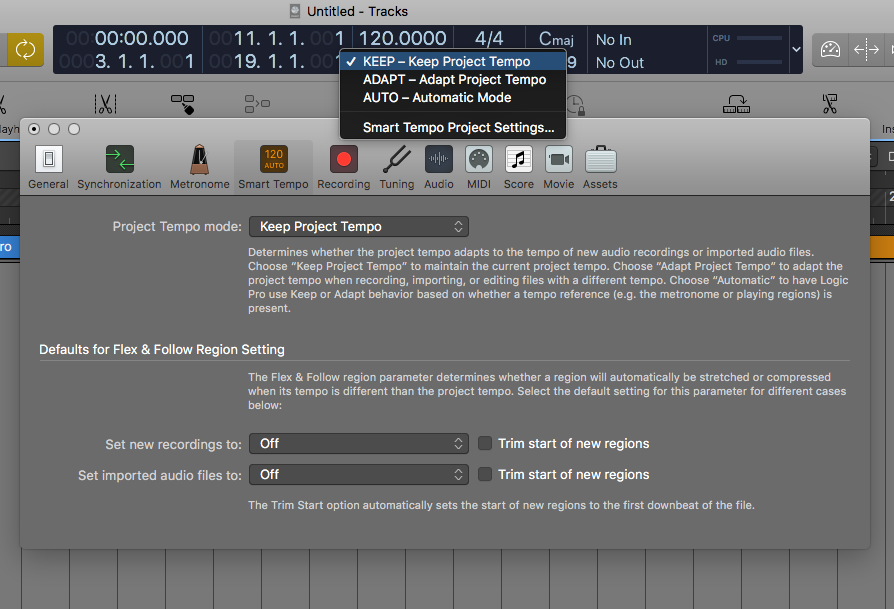
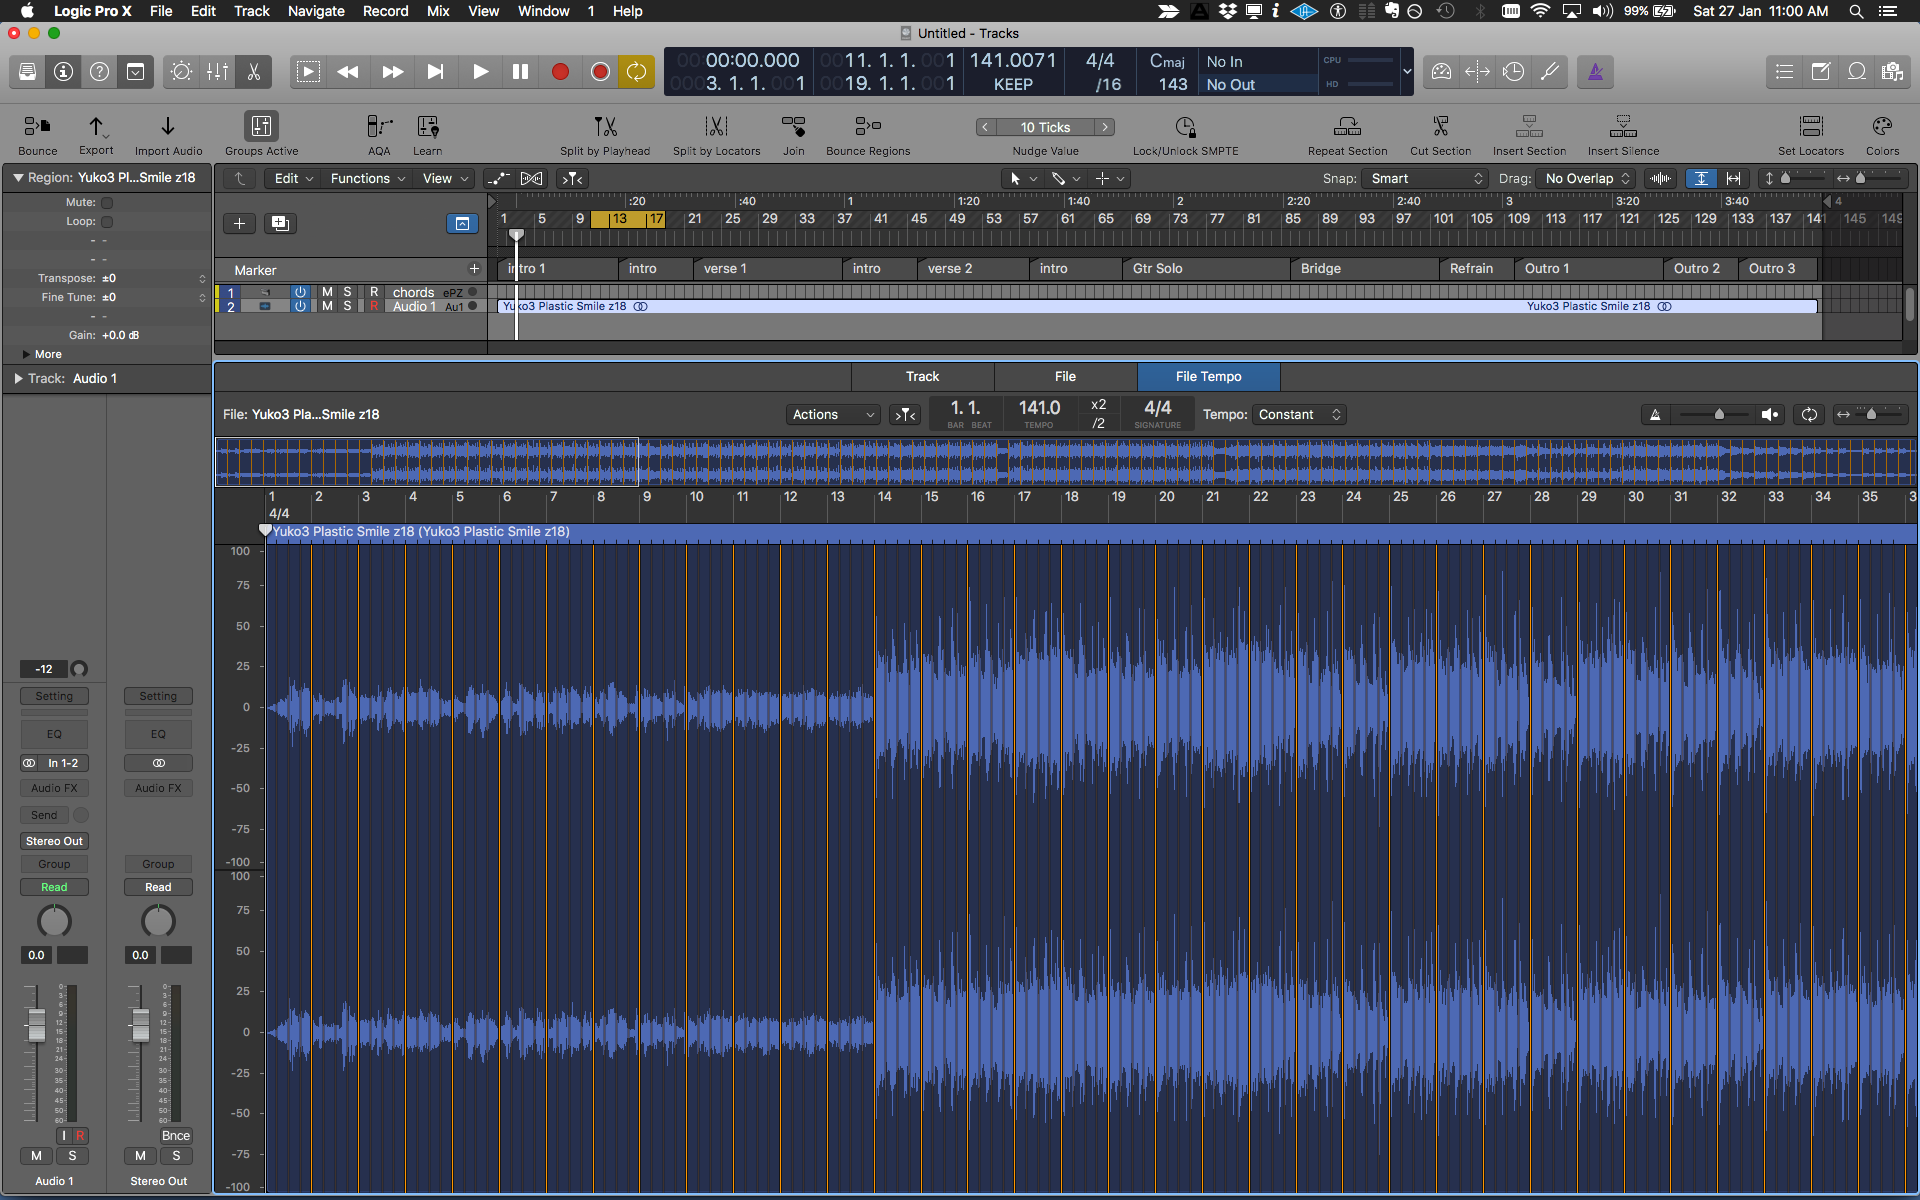
Tempo-matching features are embedded into the entire Logic Pro X application – in the top display/tool bar, in the Project Settings, and there’s a whole new File Tempo edit tab just for tweaking detection and how you want Logic to behave regarding it. It’s a complex feature that I’m going to experiment with and might do a full article on later.

There’s also a bunch of new plug-ins and instruments.

EQ

Logic Pro X Vintage EQs
Vintage EQs

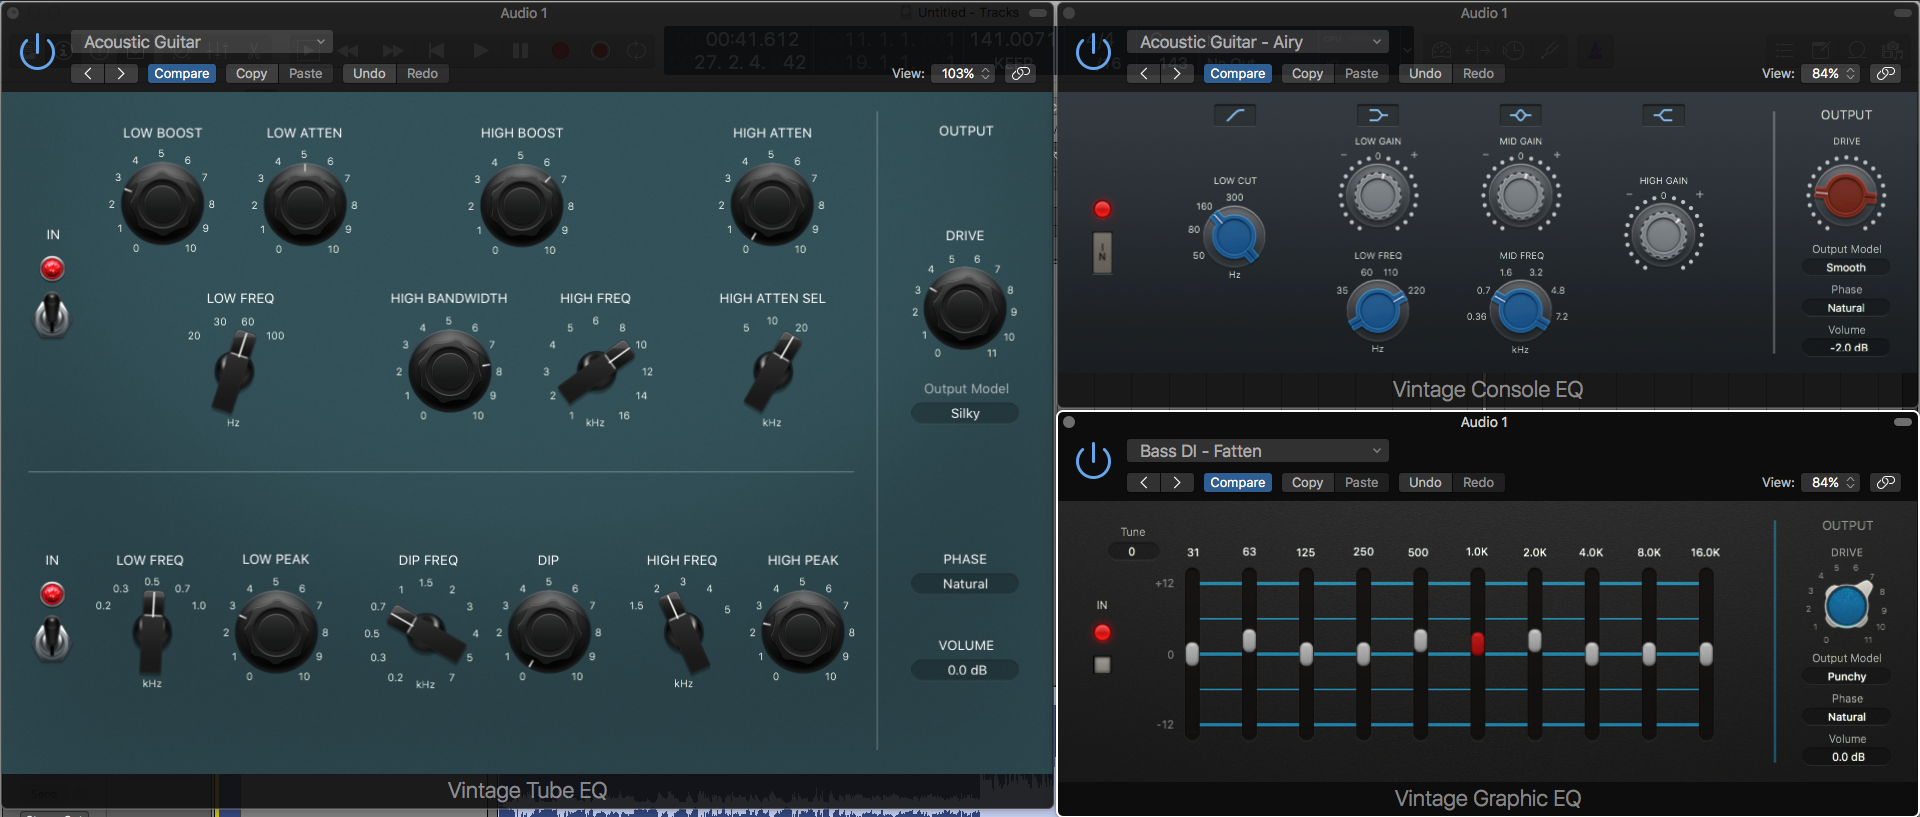
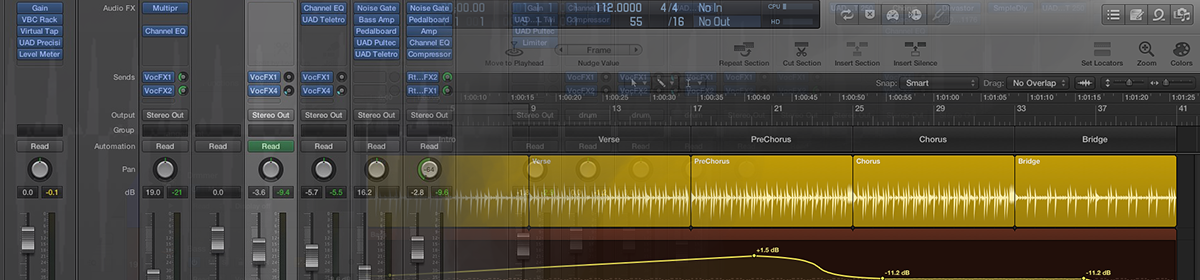
Three essential models of vintage EQs are included – Vintage Tube EQ (a Pultec clone), Vintage Graphic EQ (an API clone) and Vintage Console EQ (a Neve clone). They sound pretty nice at first listen (each has several options for tweaking coloration of sound including a linear phase mode) but I’ll need to do a bit of a test against some other modelled EQ plugins of the same type before I can really tell how good they are. Pretty darn cool to have these included in Logic Pro – now there’s finally something to match the vintage compressor models.
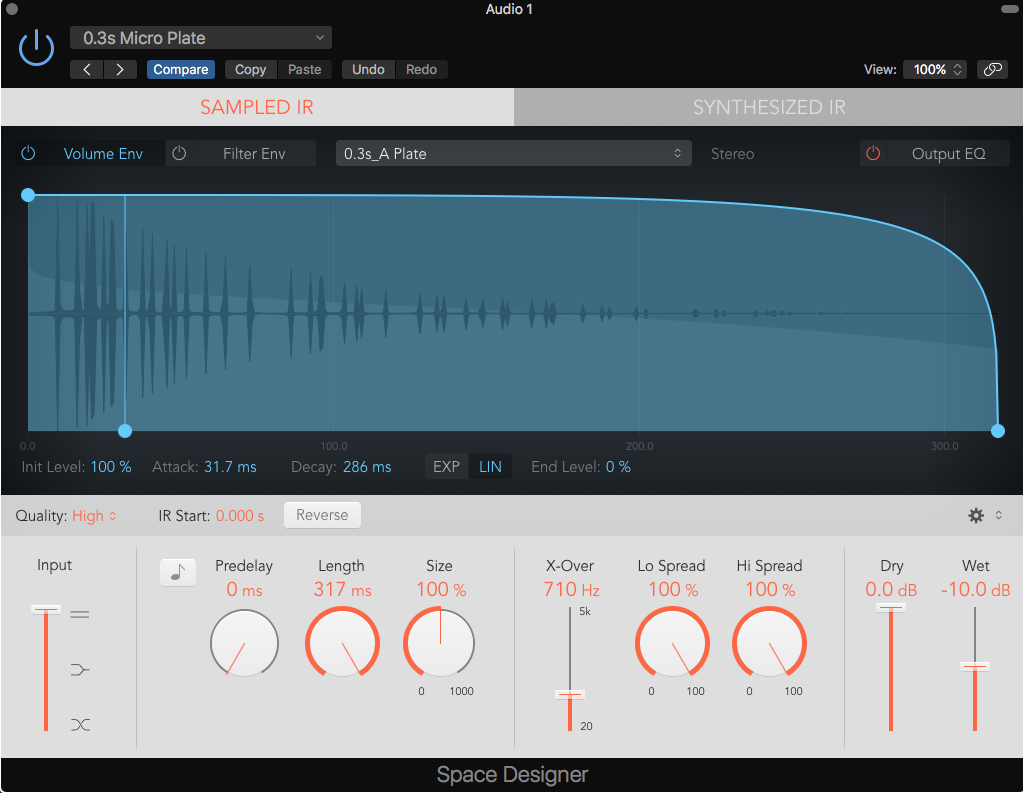
Reverb

Reverbs have had a bit of shake-up this time around, with the poor old PlatinumVerb being relegated to Legacy bin (BTW all the old legacy plugins are still available in Logic by hitting Option then clicking on a plug-in slot).

Space Designer has a had a facelift – a brand new “flat” interface that looks quite tidy. Otherwise much the same as it was before.

New Space Designer Interface

The new kid on the reverb block is ChromaVerb. This has 14 different tweak-able reverb algorithms and it sounds pretty good – especially if you switch the quality to “Ultra” mode.  It’s good to see it has some cool musical features like beat-sync-able pre-delay and decay settings. Plus a slider to mono-ise the low end of the reverb. Lots of EQ and even a damping EQ to tailor the reverb decay at different frequencies.

ChromaVerb Interface

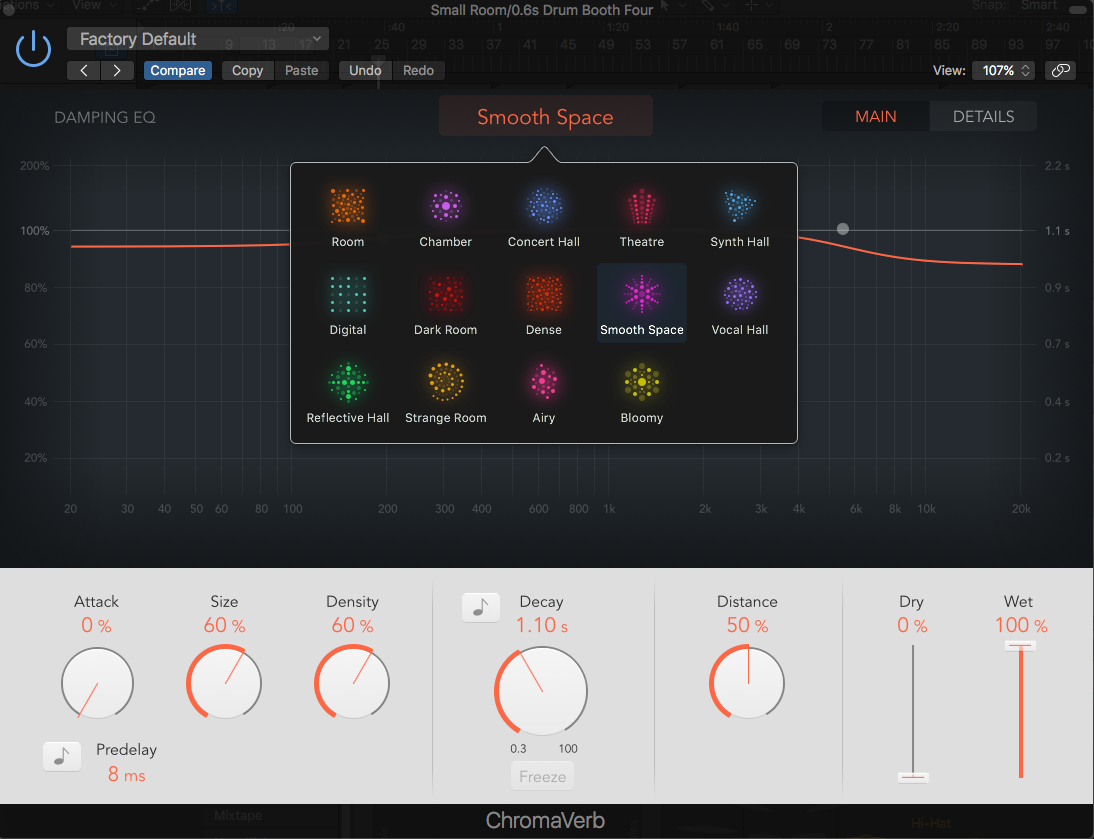
It’s also meant to have a cool real-time visualization of the reverb but it doesn’t work on my old laptop. Sad face.

Multi Effects

There’s a new category of plugin called Multi Effects which has two new plugins: Phat FX and Step FX. These, as you can probably guess, are combinations of various types of effects within the same unit. Phat FX has combinations of filters, compression, distortion, enhancers and the like, while Step FX biases towards delays, reverbs, filters and modulation effects.

Multi Effects Phat FX and Step FX

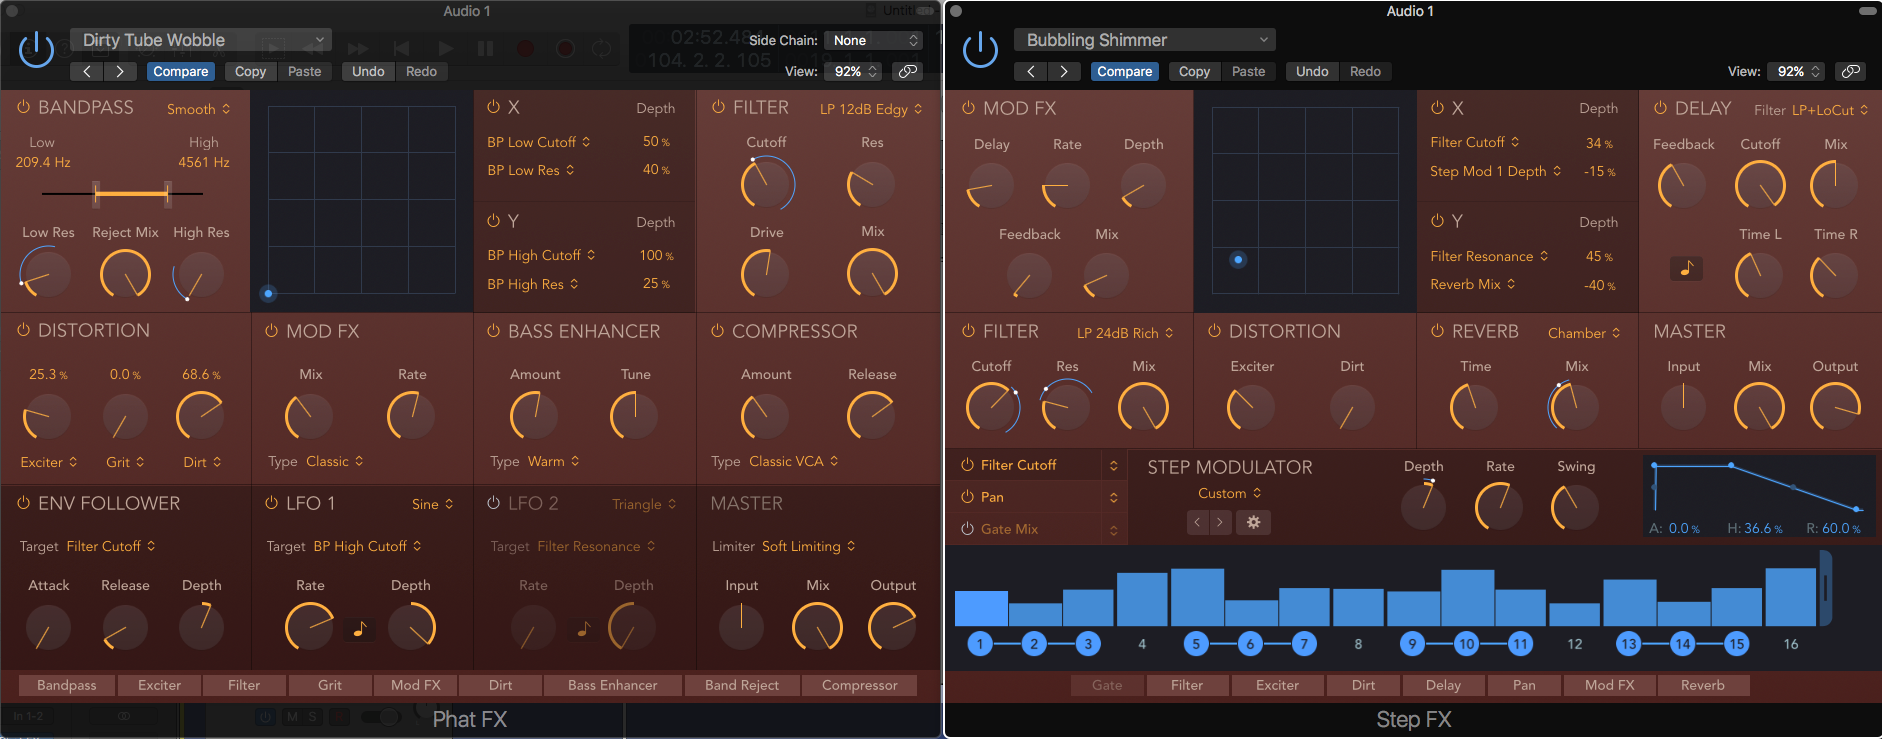
The Step FX also has a built-in step editor so you can get some groove-based effects going on. A quick browse through the patches shows that there’s some cool and wild sounds from both of these plug-ins. Could be quite inspiring.

Instruments

Apart from adding the usual slew of extra features to Alchemy, plus a bunch of extra filters to Retro Synth (these are actually pretty cool), there’s a bit of “re-bundling” been going on. As usual with Apple there’s always some added-value when this happens.

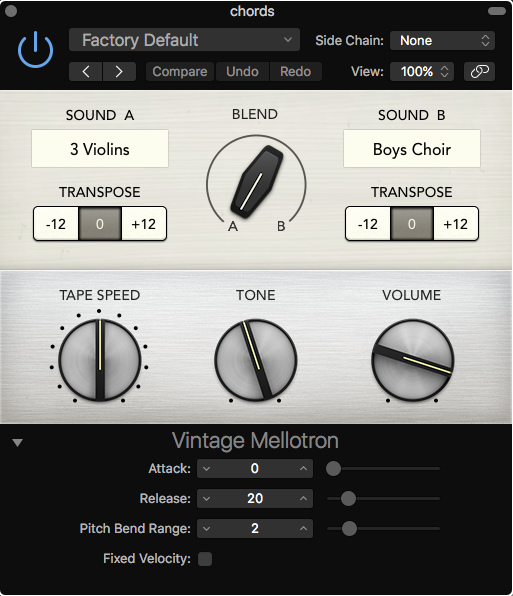
For example, the Mellotron patches have now been  bundled into a new instrument called Vintage Mellotron. It has some cool extra features too. You can blend between two different sample patches and there’s octave buttons for each patch and some control over the sound quality with tape speed and tone controls.

Vintage Mellotron Instrument


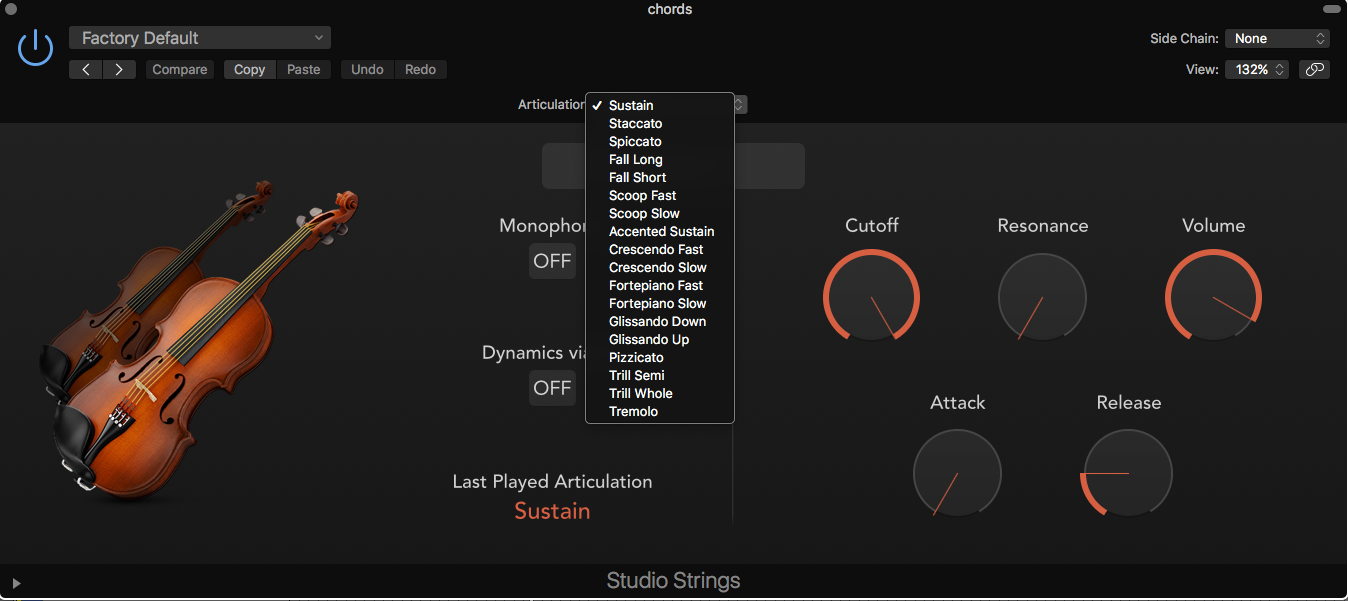
Studio Horns and Studio Strings

Another re-bundled pair of EXS-24 sets of Brass and Strings patches, these two are so much better than you’d imagine. Actually they’re my favourite thing right now. Not only have they improved and expanded the number of the recorded samples, you can play while dynamically switching between articulations (eg Sustain, Staccato, Pizzicato, Drops, Trills etc playing styles). The cool thing about the Articulation attribute is that it is attached to a MIDI note, so any note can be switched between any available articulation, giving great control over phrasing.

Studio Strings Articulation Selection
Studio Strings Instrument Selection
Studio Horns Instrument Selection
Studio Horns Articulation Selection

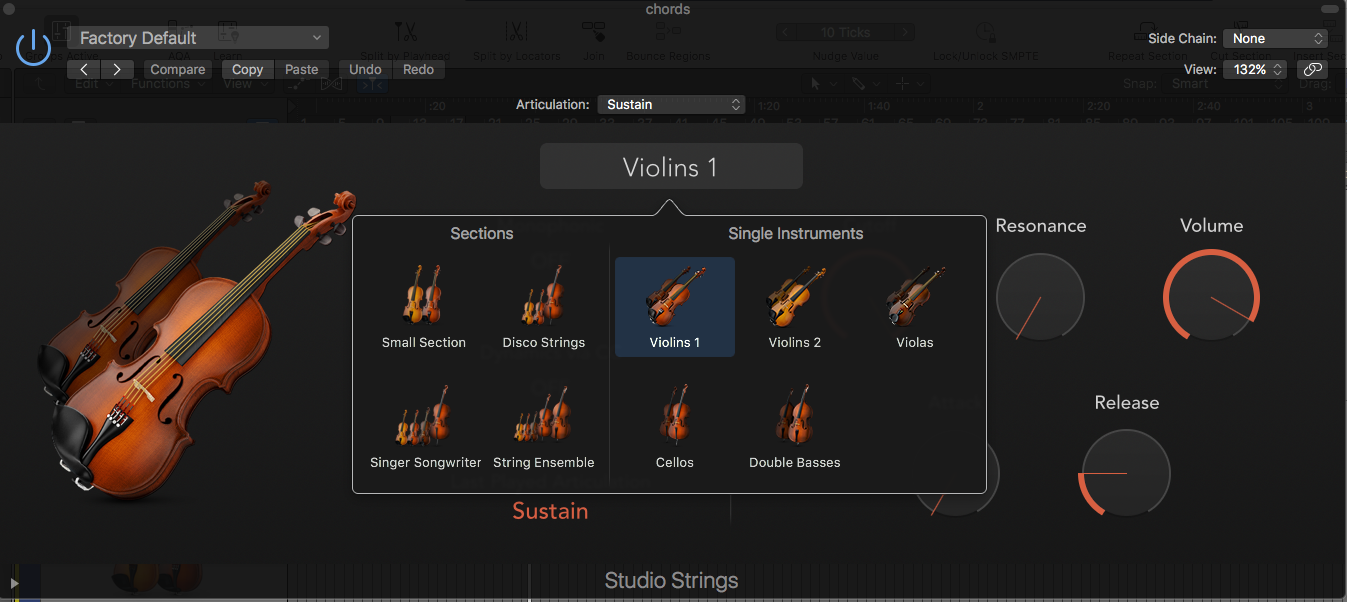
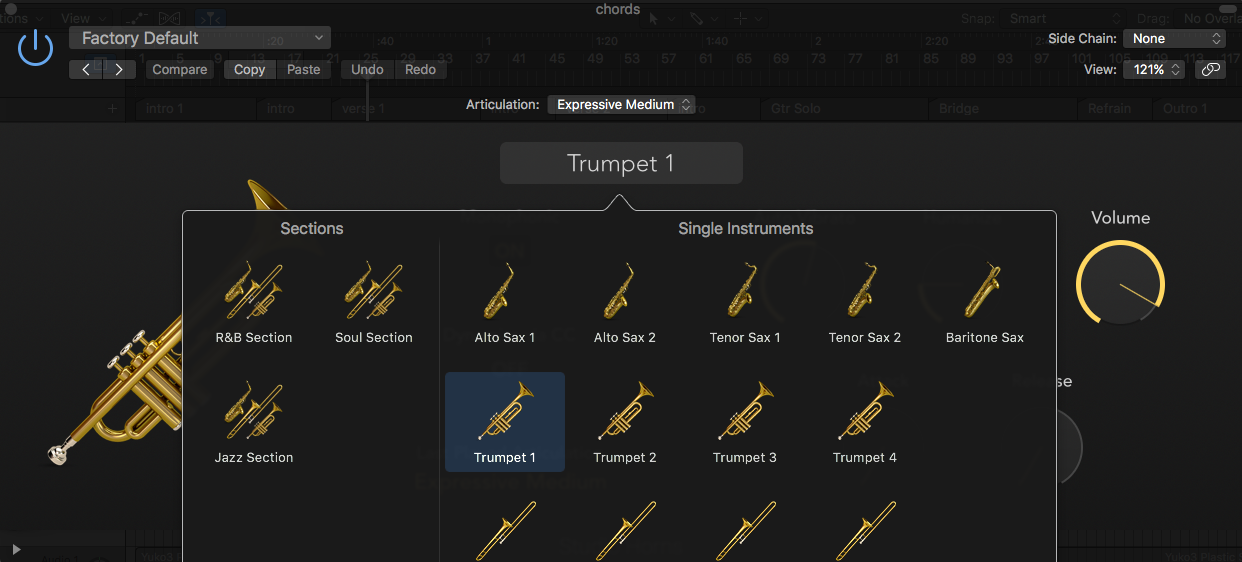
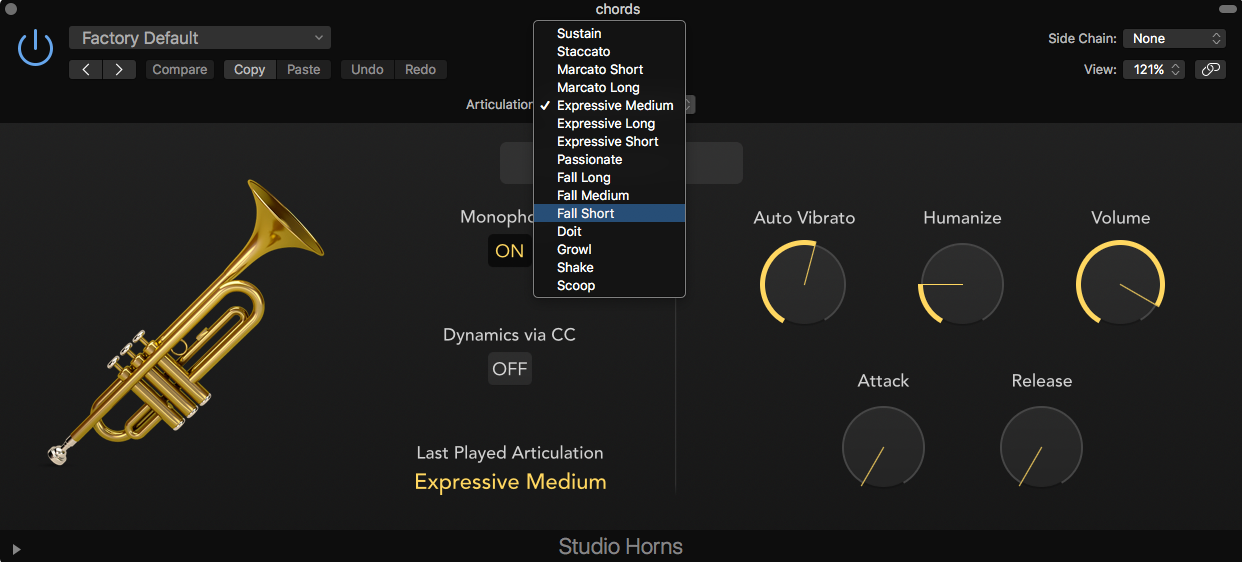
Editing a recorded Articulation is simple – where you could only do it in the Event List editor, now you can do it in the Piano Roll editor which has been given an extra Articulation selector (if Articulation is detected).

By the way – you need to select an articulation set in the Track Inspector first. Took me about half an hour to work that out.

Apple has really spent some time thinking about Articulations and have upgraded and standardized their implementation of Articulations within Logic. You can apparently customise the mapping of articulations to work with third-party instruments, although I haven’t explored that aspect yet.

Other Stuff

There’s a huge bunch of bug-fixes and enhancements. Check out the full release notes HERE if you’re interested. But here’s a few other highlights:

Marquee tool pop-up shows the length of selection. Finally! Yes!

You can normalize the gain of selected audio clips to either peak or loudness targets – including -23LUFS.

Two new drummers (Austin and Tyrell) with brush-based kits. No reggae beats yet, Apple? C’mon.

You can now choose to undo mixer and plug-in changes.

There’s some major changes to MIDI draw in the Piano Roll – this is now integrated with the Automation system. More on this in another post.

Heaps of new Apple Loops (The new brush-based Drummer loops, Future Bass, Reggaeton Pop)

You can now link plug-ins in “multi” link mode so that when you select another track it’ll show all multi-selected plug-ins for that track.

“Visions” Cinematic presets for Alchemy.

Untagged Loops browsing in Apple Loops browser (ie just regular audio loops from CDs and stuff without the Apple Loop metadata added.)

Improved grouping functions and VCA fadering.

You can bookmark other locations in the File Browser (Yuss!)

The Direction Mixer plug-in now includes a crossover.

That’s probably more than enough, eh?


How to Compact Your Logic Pro X Projects Ready for Mixing and Backing Up

Yesterday I was tweaking some mixes on a project I’m working on. One of the tracks has been through several changes – including redoing it all at a different tempo and groove. Normally I’d just start again in a new Logic Pro X project and import any tracks we still wanted, but in this case we just appended the new tempo stuff at the end of the old version within the same project so we could copy across some textural stuff that wasn’t tempo-dependent, and also to be able to see the existing arrangement to speed things up.

As you can imagine, that project ended up being huge – over 6GB. Even using the “Folder” rather than “Package” save option was seeing some huge Logic project files, and I was up to version 13 of the song.

Save as Folder vs Save as Package. Every time you “Save-as” a project you can choose between these two options. The Folder option means it uses the old hierarchical project folder-based structure including an Audio folder that contains all of your audio. This option is good if you are doing multiple versions of the song – eg v1, v2, v3 etc (I do this every time I begin another session on the song) as only the project file itself is copied each time. If you do this with the Package option, it will copy all of the audio as well, taking up much more space on your drive. The default option is Package which seems to have come from GarageBand as it is more idiot-proof.

Opening the song was taking ages and using a lot of the computer’s RAM. Removing the original early part of the song helped somewhat, but it was still taking up a lot of space on my hard drive, as all that now-unused audio was still sitting in the project Audio folder.

Here’s the steps I followed to give me a smaller project folder for mixing:

1. Copy the full project onto an an external archive drive. (Make sure the entire original project and all its audio exists in at least two different places).

2. Open up the copied Logic project. This ensures that all the files can be found and have copied across successfully. If it has to look for audio files, jump to the later section about consolidating projects.

3. In Logic, click the Browsers button, then choose the Project tab. This should show all the audio files associated with your project.

4. In the Project Audio tab use the menu Edit/Select Unused. This will highlight all audio that is no longer used in the project’s timeline. Hit the “Delete” key and this audio will be removed from the list. No it’s not deleted. It’s still sitting in the audio folder.


5. Now use the menu “File/Save a Copy As”. Make sure you tick (only) Audio files in the dialog at the bottom that says “Copy the following files into your project:”. Save to a different directory than the original project, otherwise it’ll just save back into the same folder and it will be really confusing and make most of the process useless. I recommend changing the project name slightly as well so you know this is a cleaned-up version. Now Logic will make a new copy of your entire project folder, but only with the audio that is actually being used. This should hopefully give you a smaller version of your project folder.

6. Delete the original version of the project (but don’t empty the Trash yet) and open up the new compacted version of your project to be sure it works. And yes you can tick save on the copied backup project closing dialog if you like.

If the new compacted project opens fine you’re good to go.

Misplaced Audio Files?

Logic has two audio file management options – it will either remember where they are on the drive or server and just read them from there (this can be good for large shared studio facilities with shared sound effects libraries for example), or it will copy them into the project’s Audio folder (or Media folder if you’re saving as a package). By the way – this is for files you add to Logic manually – any audio you record should go straight into the project’s Audio folder by default.

In most cases it’s safest to go with the “Copy” option, just in case the source files get moved around on the drive or deleted by accident. This can happen a lot if you’ve brought something in from your iTunes library for example.

In saying that it’s good to copy imported audio files, you probably DON’T want to include any of Logic’s other standard library files unless there is a specific reason. For example, if you tick “Copy EXS instruments and samples” in the “Save” dialog box and then browse some grand piano patches, you’re going to fill up your project folder with huge amounts of piano samples pretty quickly. You can, however, leave “Copy Alchemy audio data” ticked, as it only copies imported audio, not library files.

So when you’re first saving your project and the Save dialog is open it’s good to ensure “Audio files” is selected by “Copy the following files into your project:” near the bottom.

Save-As Audio Copy Options


If you forgot to check it, you can do it at any time under File/Project Settings/Assets as well. This will only work from that point on though, so if there are already some misplaced audio files, then you need to force Logic to collect them from wherever else they are on the drive/server.

Project Settings Assets


In this case go to File/Project Management/Consolidate. Just make sure Copy audio files is ticked and hit “OK”.

Consolidate options


Logic will now copy any externally-referenced audio into the project folder. Save!


In Case You Missed It – New-ish Cool Stuff in Logic Pro X v10.2-10.3.3

Even as a long-term experienced user, it’s hard to keep up with all the latest tweaks and additions to Logic Pro X. Especially as the updates are infrequent, but often chock full of cool stuff – some of which can be buried at the bottom of a huge list (never mind the occasional undocumented feature). Some are merely cosmetic or processor-efficiency improvements but some of these updates could change the way you use Logic if only you were aware of them. Very few Logic Pro users that I know bother to trawl through the release notes for each update. Luckily I do, so here’s a list of some of the cool things that were added over the last year or so.

Transpose and reverse audio regions.

In case you missed it, there’s a couple of extra things in the region inspector pane for audio regions. You can now transpose (in semitones and cents) any audio region (it doesn’t need to be an Apple Loop). You can also reverse playback with a tick-box, and depending on other variables like whether it’s recorded or imported; change speed, follow tempo changes etc.

Reverse Audio

Reverse is pretty simple and just plays the file backwards, but transpose uses the Flex engine (if you haven’t ticked “Follow Tempo and Pitch”) so there can possibly be some artifacts depending on the Flex mode chosen.

Transpose Audio

Change Speed only seems to work if you have selected “Follow Tempo and Pitch”, in which case like with Apple Loops you can go from 1/8th speed to 8x speed. Crazy.

Audio Speed

Channel Strip Stereo Pan

One of the problems with producing music with audio instruments is that they all tend to be fully stereo. If you dial up one of Logic’s grand pianos for example, it will usually have the low notes panned to the left and the high notes to the right. This sounds impressive if there’s very little else in your mix, but otherwise it can clutter the mix as well as making the left side bass-heavy.

If you use the pan knob on the channel strip, it’s actually a “balance” control for stereo instruments. So in the case of the stereo grand piano, if you turn the balance to the left, it’s not moving the entire piano to the left, it’s turning down the high notes panned to the right and only giving the low notes panned to the left. That’s not good, unless you actually want this to happen. Maybe you have an over-playing pianist and actually want to remove some of the low bass piano notes by balancing to the right.

But if it is a problem, the usual way of dealing to this issue in Logic Pro is either to use a mono version of the instrument (you can substitute it at the top of the plug-in menu without losing your current instrument settings), or you can insert Logic’s “Direction Mixer” plugin which gives you much more control over the width and rotation.

But now Apple has added an extra feature to Logic – a stereo pan control. If you right-click on a Balance knob, you can select “Stereo Pan” instead. (Note that there’s also a cool “Binaural” mode which has been in Logic almost forever but might be useful again now that surround is becoming a thing outside of film).

Once you have accessed the stereo pan control – you can click and drag in the middle of it to move your entire stereo image left or right – that’s moving both sides of the piano left or right now. Try it and see – it sounds a lot richer than the old balance control. If you carefully click in the top centre of the little highlighted ring, you can drag up to make it more mono. You can Command-click on it to flip the left and right sides as well (the ring will turn orange).

Mid-Side Audio Plugins

The last couple of years has seen a bit of a trend in mid-side mode, mainly coming from the mastering scene. Mid-side gives the ability to process the center and outsides of a stereo track or buss separately. For example in a stereo drum buss you could EQ the center differently to the sides – maybe your cymbal crashes are too harsh but you still need that presence on the snare. Or maybe you could limit only the outsides of the drum mix to control the panned cymbal crashes. It’s also obviously darn handy for directly decoding recordings done in M/S mode. This functionality has previously only been available by purchasing third-party plugins that include this feature, or by some complicated mixer bussing trickery.

Mid-Side Plugins

Logic has now given us the ability to directly insert ANY stereo audio plugin as mid-side. In fact what you do is insert it as “Dual-Mono” first, which gives you the ability to independently control each channel, then you can switch it to “Mid-Side”. You can also “Couple” both channels to make it convenient to set up an overall sound before tweaking each channel separately.

Duplicate Track with Contents

Hopefully you already know you can click on the little drop-shadowed “+” button to create a duplicate track of the selected one with same settings. If you Command-click on it, it will also duplicate the contents of the track.

This is super-handy for “checkerboarding” regions across two tracks. I use it often to separate single instrument tracks into a verse/chorus/bridge chunk so I can treat each track/section slightly differently with levels, effects, and EQ. Much faster and simpler than basic section automation.

Duplicate Content

They’ve tweaked this a bit so that the duplicated regions are unique (when they first introduced this feature any region edits on the duplicate would also happen on the original track – awkward).  Also – if you now duplicate an armed track, the duplicate will be armed, not the original, so it’s all ready to record.

Note that you can also Option-drag a track header to duplicate it with contents.

Selection-Based Processing

Logic users have been crying out for this for years (and Pro Tools users have often scoffed at Logic’s lack of this feature), but now it’s here not many people even know it exists. Actually – I just have to mention that very early pre-Apple versions of Logic actually DID have region-based Audiosuite capability.

So now you can (again) make a selection on an audio region, then apply a plugin or set of plugins to it. Double-click on a region to open it in Track View. Then go to Functions/Selection-Based Processing.

Selection-Based Processing

The dialog that opens gives you two plugin chains that you can toggle between, plus a bunch of rendering options. There’s some generic presets already provided, but be careful, as sometimes the mono/stereo aspects may not match your file. It will still sound okay, but can be messy having a processed chunk that is, for example, stereo on a mono track.

It would be advised to individually add your own plugins and tweak them, and then save them for use later. Note that there’s also a key command to repeat the last processing – very handy for repairing or processing lots of the same sort of thing in a track.

Track Alternatives (Like Pro Tools’ Playlists)

This is one of my most-used and favourite features since its introduction. I’ve also found it’s especially handy for dealing with Take Folders.

First you have to make sure the view option is turned on for “Track Alternatives”. You can do that either with the Track Header settings, or using the Track menu.

Just like with Pro Tools playlists, you can either duplicate a track, or create an empty track. Using the little bracket menu on each track header you can even view all of a track’s alternatives at the same time (Or by using Option on the menu you could see every track’s alternatives at the same time) so you can move or copy things things around if needed.

Here’s what I like to use it for;

Say you’ve got a vocal comp in a Take Folder.

Duplicate the track. Now you have Alternative <B>. Flatten the take folder. Now you can easily tidy up breaths and fix tuning if need be. Later if you realise you used a wrong selection in the comp, you can select the original Alternative <A> and then duplicate again to give you <C>. Now flatten this version of the Take Folder and use that instead. Or simply cut and paste the correct part across to Alternative <B>.

It helps if you actually name the alternative tracks as well rather than just leaving the default track name with “A”, “B” etc.

Previously I used to use a duplicated (muted) Hidden track for this vocal comping safety copy, but the Track Alternative system is much more graceful and convenient.

Drummer Apple Loops.

This addition of Drummer loops to the Apple Loops library is a much better way to find the right sort of Drummer groove for your project.

Rather than the old slow method of creating a Drummer track, selecting a style, selecting a drummer, checking their various beats, changing to another drummer, checking those beats etc, you can just preview the beats directly in the Apple Loops browser.

Drummer Loops

Then, like all Apple Loops, you can simply drag your Drummer Loop into the Main Window in Logic to create your Drummer track. This is so much faster.

Recently, three more percussion-based Drummers were added to Logic.

Bonus tip: If you prefer your own custom Drummer grooves/kits – you can drag a Drummer region onto the Apple Loops browser to create your own Drummer loop library.

Recently-Used Plugin List

This can now be turned off in the preferences, but I find it incredibly handy. You can also use the plugin manager to not only sort things into folders, but also add essential plugins to appear just under the Recent list under “Top Level”.

Plugin Manager

Undo an early edit without undoing all the bits in-between

An oldie-but-goodie – this allows you to go back to an earlier edit without also losing a bunch of stuff in-between now and then. For example, let’s say you deleted an un-needed MIDI region, then spent 15 minutes editing some MIDI notes in another region, then decided you actually still needed that first region. You could keep hitting “undo” until you got back to where you deleted the region, but then you lost all the editing in-between.

Undo History

In Logic’s menu Edit/Undo History you can Command-click on a previous undo and only undo that single item by itself. Logic will warn you that the universe may implode if you try it, so beware.

Automatically create a fade-out on the Main Output.

To get a basic 10-second fade at the end of your project, go and select the menu item Mix/Create Track Automation/Create Volume Fade out on Main Output.

Main Output Fade-out

Change speed of entire Logic Project (including audio) using Varispeed

This has actually been in Logic from waaaay way back (version 9?), but as most Logic users that I meet don’t know it even exists I’m adding it in here anyway – plus it sounds a lot better in the latest versions of Logic.

Add “Varispeed” to the Control Bar by right-clicking in a blank part of it and adding via “Customize Control Bar and Display”. This adds two things – a “+-” button to toggle Varispeed on and off, and the actual Varispeed controls in the display itself.

Varispeed Controls

There’s a bunch of options for whether you want to change just speed or speed and pitch (and whether to include MIDI in pitch changes), how you want to measure the changes (eg BPM, percentage) etc. Check Logic’s help menu for full details.

This is very handy for tweaking overall tempo slightly if the song isn’t quite gelling properly, or for helping make the length fit an exact time. Also very handy for slowing the song down temporarily to record a tricky part, then speeding back up again.

High-Precision 64-Bit Mixing

Most DAW mix busses use 32-bit floating-point summing, which gives a ridiculous amount of headroom for mixing all those tracks together (Around 1,500dB of headroom). However it does leave something to be desired when summing a range of different track levels together as there is a “scaling” error that can creep in. Using the 64-bit mixer increases the resolution of the summing bus and reduces some of this error, potentially improving the overall sound quality. Select the 64-bit option under Logic/Preferences/Audio

64-Bit Summing

Brush Tool in Piano Roll

This cool new tool was added back in version 10.1 but some people haven’t discovered it yet. It’s really handy for drawing repeated kicks, snare or hihats and like a Photoshop brush, you can make it remember a bunch of notes (and other MIDI events) and draw that shape. This can be handy for repeating drum fills, or even copying an orchestral arrangement elsewhere or adding a harmony line.

In standard format the tool draws notes on a grid based on the quantize setting set at the side the piano roll window. It can be hard to draw along a straight line (especially if your workflow includes drinking wine) but if you don’t let go of the mouse button you can back up and redraw any notes that are wrong. Once you let go of the mouse button, the tool now switches to an eraser if you hold it over notes, so it’s easy to swipe-erase as well.

Brush Tool

To program a set of notes into the tool, (make sure you’re not using the brush tool or you’ll just draw instead of selecting) select some notes, switch to brush tool, then control-click on the background and select “Define Brush Pattern”. Now when you draw, all those saved notes will be revealed as you drag out the mouse. You can start anywhere to transpose, and even draw backwards to get the reverse pattern. Try it – it’s pretty cool. You can reset the brush pattern by following the steps above and selecting “Reset Brush Pattern”.

Modulator MIDI Plugin can control audio plugins on the same channel strip

This is a actually pretty cool, and a really fast way to get some variety going on without doing proper automation on a track. One of the things I like to use it on is to automatically switch the Leslie speeds on an organ track, but you can make it learn any audio plugin parameter.

Modulator

In some ways it’s a bit like Pro Tools’ modulated automation pen tool, but in a plugin. It’s a pity you can’t use it on audio tracks – only instrument tracks have the MIDI plugin slot. Now if Logic just expanded their MIDI patching capabilities to include MIDI busses and/or sidechains…

Arpeggiator MIDI plugin can now export input (source) material as well as output (arpeggiated).

The arpeggiator is a pretty fun MIDI plugin. You might have noticed that while it’s running you can drag the little highlighted box onto a MIDI track to obtain the actual arpeggiated MIDI data.

Well now you can also grab what’s coming INTO the Arpeggiator as well – there’s an extra little box there now.

Arp Grab

What this is really handy for is for grabbing a chord out of the Chord Trigger MIDI plugin. If you’ve ever jammed through the Chord Trigger but then decided the chords are close but not quite what you wanted, it’s a real pain to manually analyze them, and then input the correct chords. Now you just make sure you have the Arpeggiator inserted after the Chord Trigger and just play, whilst dragging Arpeggiator’s little “Input” box onto a MIDI track. You can deselect the Play button on the Arpeggiator if it annoys you.

Also – in case you haven’t tried it yet – the Arpeggiator has a “swing” function which is cool.

Custom Icons on Track Headers

Actually we have had the ability to add custom icons to Logic’s track headers for years, but it was a pretty involved process that required creating the correct size TIFF files, allocating them an unused file number, and then putting them into the correct folder on the hard drive so Logic could then find them. Nobody had time for that.

Now you can just drag an image file from your hard-drive or even something like Google images onto a track header and Logic will do all that other stuff automatically. It might look a bit shitty depending on the source file, and of course there’s copyright issues, but you get the idea. It’s best if it has a transparent background too.