Using aliases with Logic X’s Drummer to layer kick and snare tracks

One of the cool tricks you can do with Logic’s Drummer regions is to drag out an alias of the Drummer region to another software instrument track. (Drag a Drummer region with mouse while holding Shift-Option). Aliases are virtual regions with no content of their own – they just follow another region’s content (although you … Continue reading “Using aliases with Logic X’s Drummer to layer kick and snare tracks”

One of the cool tricks you can do with Logic’s Drummer regions is to drag out an alias of the Drummer region to another software instrument track. (Drag a Drummer region with mouse while holding Shift-Option).

Aliases are virtual regions with no content of their own – they just follow another region’s content (although you can still do stuff to them like transpose them etc).
Shift-Option drag Drummer region to create an alias

This new software instrument track can be another Drum Kit instrument, or a Drum Machine, sampler or even a third-party drum instrument like Slate’s SSD drum sampler.

Now your new instrument track (via the alias) will play exactly the same thing as the Drummer pattern. Even if you go back and tweak Drummer the alias will still follow it. And if you mute the Drummer region, the alias still works, and you will continue to hear the Drummer pattern through your new drum instrument.

That’s pretty cool, but what if you don’t want to layer the entire kit  – perhaps just the kick or the snare?

That’s easily done too;

On the new alias instrument track, go to its Track Inspector pane. It’s the second box down in the Inspector window on the left. It’s usually hidden, so you might have to click the little disclosure triangle to pop it down.

Now you should see a “Key Limit” line, with something like “C-2 G8” in it. These are the low and high key limits, and it means that this track will currently accept MIDI notes over the full range of possible MIDI notes from C-2 up to G8.

Set the track’s Key Limit range down to a single note – eg C1 for Kick drum, or D1 for Snare

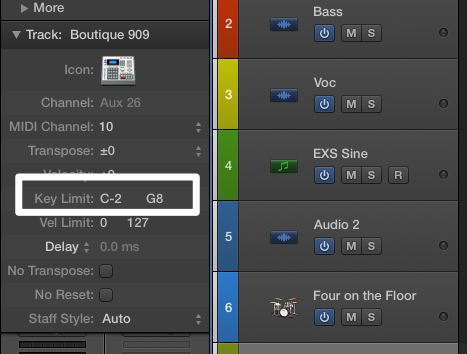
If you only want to trigger the kick, double click the “C-2 G8” and type in “C1”. You should see two C1’s – meaning only this one MIDI note will now be accepted. You should only hear the kick drum.

And if you want a layered snare as well?

With the same instrument; Create another Virtual Track going to the same instrument; Menu: Track/Other/New with Same Channel

Drag a copy of the alias to this track. (Option-drag alias with mouse)

On this track, double click the Key Limit numbers and type in “D1”. This will now only accept the snare MIDI note.

With another instrument; Create another software instrument track and dial up a drum patch.

Drag a copy of the alias to this track. (Option-drag with mouse)

On this track, double click the Key Limit numbers and type in “D1”. This will now only accept the snare MIDI note.

As you’ve probably figured out by now, you can carry on and layer as many extra kicks and snares on different drum instruments as you feel like.

Bonus tip for handy kick and snare layers:

Load up an instance of an EXS24 in a new instrument track. (In the Patch Library select Legacy/Logic/Logic Instruments/EXS24)

Click the EXS24 slot on the channel strip to open the EXS24 front panel up.

EXS24 Kick Drum Layer Samples

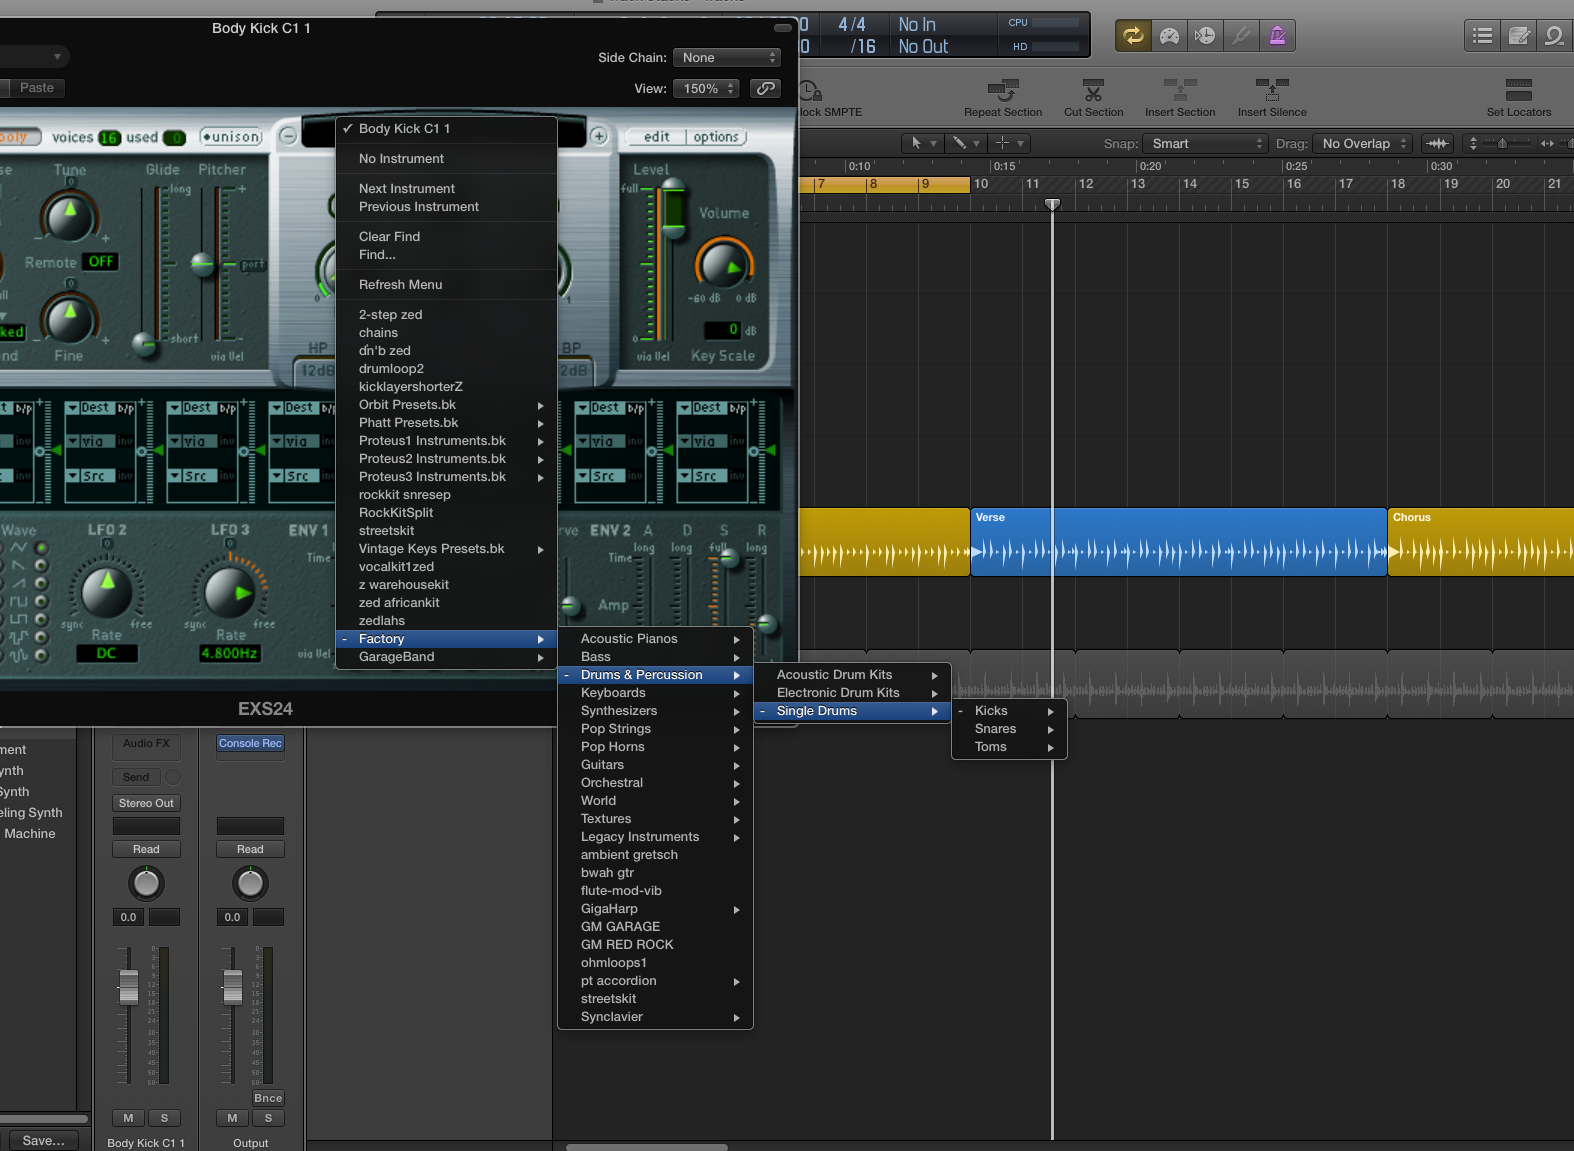
In the little panel above the Cutoff Knob, click and select Factory/Drums & Percussion/Single Drums/Kicks/Layer Kicks/Body Kick C1 1. If you click the little “+” symbol to the right of the panel you can step through each sample in turn.

As you can see there’s a whole bunch of “body” and “transient” kicks (and snares) that can be used to layer your existing kicks (and snares). Some of these sound great, although the “body” kicks sound unusual by themselves as they’ve had the transient part trimmed off the front.

Drag your Drummer alias onto one of these EXS24 tracks and set the Key Limits for the track as explained above and you’re away laughing.


Tighten up your mix by using track-offsets

One of the cool things you can do so easily in a DAW (Digital Audio Workstation) is slip entire tracks, or actually the regions within it, to the left (earlier in time) or to the right (later in time). What’s so cool about this? There’s a couple of things you can do with it. 1. … Continue reading “Tighten up your mix by using track-offsets”

One of the cool things you can do so easily in a DAW (Digital Audio Workstation) is slip entire tracks, or actually the regions within it, to the left (earlier in time) or to the right (later in time).

What’s so cool about this?

There’s a couple of things you can do with it.

1. Correcting Microphone Delays

One fairly obvious example is tightening up drum kits. It’s pretty common to use room mics when recording a drum kit. Let’s say your room mics are 3m (9.8feet) from the snare mic on the kit. That’s about an extra 8 milliseconds, or (@44.1kHz sample rate) 353 samples.

If you slid your room mic regions 8ms/353 samples to the left, the recorded signal would coincide perfectly with the snare mic – ie there would be no delay between the mics.* Note that you’ll need to have all your tracks starting a little bit later than 0′:00″ or Bar 1 so you have some “left” to go to.

You don’t have to pull the room mics all the way back though – you might just want to pull them a bit closer in time to tighten up the room sound.

2. Creating a Pocket/Helping the groove

This is where you can subtly shift the timing of regions to help the overall groove of the track.

For example, many bass players get a little excited when recording, and can play a little ahead of, or right on top of the drum beat. Although it’s still “in time”, sometimes delaying the bass very slightly can make it “groove” more with the drums.

In this case you would incrementally slip the bass region/s to the right until the groove feels better. The kick drum often masks the attack of the bass to a certain extent, so it can also clean up the kick/bass combination.

It can help to think of being “in-time” as a window rather than a vertical line, and you can be at one edge or the other of that window and still be in time, but get some huge changes in “feel”.

How to do it

There’s a couple of methods.

Shifting the actual region itself using “nudge”. In Logic or Pro Tools you can incrementally bump something in either direction by using the nudge keys. You can set the nudge value to pretty much anything -samples, beats etc. The dangers of this method are if you give the files to someone else to mix they may not realise you’ve moved track regions away from the same start position. Keep good notes!

Screenshot_28_09_14_12_12_pm

Region Delay in Logic Pro

In the region inspector (under “more”) there is a parameter for Delay. You can set it earlier (- values) or later (+ values). The handy thing about this way of doing it is that you can split each track into different regions for chorus/verse etc, which can each have a different delay value.

Using delays. This is the old-school way of doing it. Insert a delay plug-in (with the same delay value eg 500ms) on every track. If you want to make a track play earlier – lower the delay for that track. If you want it later – make the delay longer. The beauty of this method is that it automatically keeps a record of what you’ve done by saving the plugin settings.

*Phase problems. Watch out for this. Once you get down to a few samples difference between different microphones on the same instrument (eg the drum kit), you’re potentially going to get phase issues. Sometimes even a few samples can make a difference. The wavelength of around 2cm (almost an inch) is 13.5kHz, so that means moving the microphone “virtually” even that much can make a big difference. This is where phase “rotation” plugins can be handy – such as UAD’s Little Labs IBP Phase Alignment Tool.

Review – Sound Radix “32 Lives”

For those that recently jumped into purchasing Apple’s latest version of Logic Pro X, there may have been a few nasty surprises with older 32-bit plug-ins not working. That’s because Apple finally dropped support (as it seems to do on a fairly regular basis) for aging 32-bit plugins and instruments. Actually, they just removed the … Continue reading “Review – Sound Radix “32 Lives””

For those that recently jumped into purchasing Apple’s latest version of Logic Pro X, there may have been a few nasty surprises with older 32-bit plug-ins not working.

That’s because Apple finally dropped support (as it seems to do on a fairly regular basis) for aging 32-bit plugins and instruments. Actually, they just removed the 32-bit plugin wrapper which Logic 9 had. The wrapper was pretty clunky and annoying anyway – it continually stole focus from Logic when you needed to open a 32-bit plugin’s graphical interface.

The lack of Logic’s 32-bit wrapper means that third-party plugin providers would now need to update all their plug-ins to 64-bit, or they simply wouldn’t show up in Logic. Unfortunately, the outcome of this strategy is that it can take ages for manufacturers to get around to updating all their products, especially the older ones that may not have been coded very tidily in the first place. In fact some manufacturers had already dropped support for older plugs and instruments, so the likelihood of getting a shiny new 64-bit version of some products is pretty much nil.

That’s a bit sad when you want to open up a song you created only a couple of years ago (because you might not have finished it yet), and instruments and/or plugins are missing. It can completely change the track – it may even remove the main hook sound that the track was built around.

Even with instruments and plugins that have actually been updated to 64-bit, there are issues. Some newly- ported 64-bit plug-ins do not open up their original patches anymore. This can be phenomenally annoying. Imagine your joy at finally being able to open up your old song in Logic to do some more work on it, only to find that the instruments or plugins you used have been restored BUT they are restored to completely different sounds or settings. It’s tedious enough trawling through hundreds of presets trying to locate the one you used for your song, but it’s way worse if not impossible to recall a patch if you actually edited it as well – it means you may never get that exact same sound back.

Of course you could simply keep an older version of Logic on your computer to open these older songs, and sometimes that works, but even then it’s not always that simple. Installing later versions of some products pretty much destroys the previous version’s patch library, so even opening in Logic 9 doesn’t get them back. Can you feel my simmering anger?

But look – there’s a shining star on the horizon! Sound Radix – a company with some quite interesting plugins themselves, observed the problem everyone was having with lack of 32-bit support in Logic Pro X and came up with a great solution. What they did was create a very tidy wrapper for your 32-bit plugins. Due to the quirks of some older products, not everything was supported at first, and 32 Lives is ostensibly a “beta” product (it’s just reached release candidate recently). Regular updates were released to make even more 32-bit plugins compatible. I found that even some of the plugins that weren’t on their compatibility list seemed to convert and operate just fine.

So how does it work? The application scans all your installed AU plugins and comes up with a list of the 32-bit versions. You can select which ones you wish to wrap, and away it goes wrapping them. It creates 64-bit versions of each of these plugins. Then when you open Logic Pro X (or Logic 9 in 64-bit mode), Logic scans the “new” plugins. I found this to be the most tedious part of the process, and Logic’s scanning process actually seemed to reject a bunch of the wrapped 32-bit plugins when it completed. I think there are issues with the way Logic scans multiple plugins at the same time on different CPU threads, so if one instance of Auval (Logic’s AU plugin-scanner) or 32 Lives crashes during the scanning process, it can affect other threads. I found that selecting each rejected plugin/instrument manually in AU Inspector in Logic seemed to add the rejected ones just fine in most cases. (Note – this scanning issue has all been sorted out in subsequent releases of 32 Lives)

The wrapped plugins and instruments now appear just like 64-bit versions – but there’s no annoying visible wrapper like in Logic 9. The patches you originally used are also restored. It just works. Transparently.

I spent several hours opening up old Logic sessions from years ago and had no problems opening them up and playing them. Actually my only issues were with really old versions of Native Instruments products, but that’s another story.

So – I have to say I was pretty darn happy with this purchase. Good on you, Sound Radix!


Using Logic’s Smart-Tool mode plus using the Marquee tool for Power-editing

It continually surprises me (yes I’m in a perpetual state of surprise) how many Logic users don’t use (or even know about) the Marquee tool. Then again, I remember the first time I tried using the Marquee tool, and all it did was annoy me since I didn’t really know how to use it, so … Continue reading “Using Logic’s Smart-Tool mode plus using the Marquee tool for Power-editing”

It continually surprises me (yes I’m in a perpetual state of surprise) how many Logic users don’t use (or even know about) the Marquee tool. Then again, I remember the first time I tried using the Marquee tool, and all it did was annoy me since I didn’t really know how to use it, so perhaps that’s what’s happened to everyone else as well.

Well, fear no longer people, here’s the tricks to some happy Marquee Tool use in Logic.

Also – one of the common whinges from Pro Tools users is Logic’s lack of a “Smart Tool” mode  – where various tools are automatically selected by their position on a region. This function is always partly-available in Logic anyway (just trim & loop), but you can easily add a couple more tools to the palette by following the next screen shot. This works in Logic 9 as well.

As you can see, I prefer to assign my right mouse button as a tool, and just use Ctrl-left mouse click to bring up any menu items I need. That way I have even more edit tools rapidly available.

Window_and_Preferences

By selecting these options above, the good ol’ Pointer tool will now automatically become the Fade tool on the TOP right and left of a region (click again and drag up and down to change the shape), and the Marquee tool when in the BOTTOM-half of a region. This is in addition to the traditional Pointer tool also being the Trim tool on BOTTOM left/right of a region, and Loop tool on MID-right of a region.

I recommend that you try these settings and persevere for long enough to get used to them, as it will speed up your editing, and it helps when jumping between Logic and Pro Tools. It does take a little more precision and decent zoom settings but the pay-offs are worth it.

It’s at this point in the article that I rediscovered the annoyances of trying to get decent screenshots of Logic’s tool cursors. You can’t do it with the usual Apple shortcuts or even the Grab utility. The cursor doesn’t show up as other than the usual boring cursor (Grab lets you choose a few other cursor options, but certainly not any of the Logic tool cursors).

SO – I made you a short video instead, using Screenflow. I show the “smart-tool” setup and use, then how to use the Marquee tool.

Here it is;