It continually surprises me (yes I’m in a perpetual state of surprise) how many Logic users don’t use (or even know about) the Marquee tool. Then again, I remember the first time I tried using the Marquee tool, and all it did was annoy me since I didn’t really know how to use it, so perhaps that’s what’s happened to everyone else as well.
Well, fear no longer people, here’s the tricks to some happy Marquee Tool use in Logic.
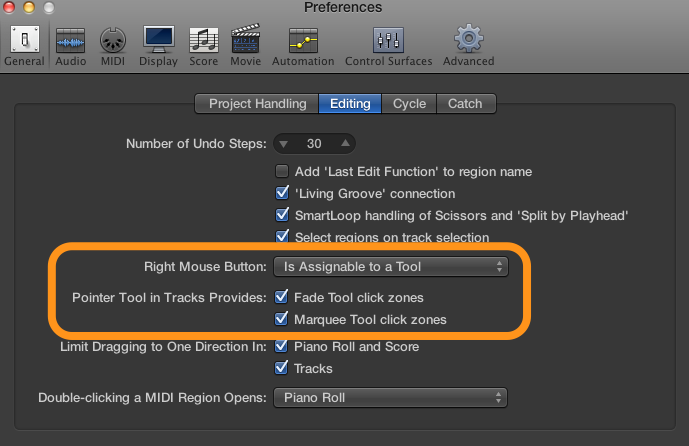
Also – one of the common whinges from Pro Tools users is Logic’s lack of a “Smart Tool” mode – where various tools are automatically selected by their position on a region. This function is always partly-available in Logic anyway (just trim & loop), but you can easily add a couple more tools to the palette by following the next screen shot. This works in Logic 9 as well.
As you can see, I prefer to assign my right mouse button as a tool, and just use Ctrl-left mouse click to bring up any menu items I need. That way I have even more edit tools rapidly available.
By selecting these options above, the good ol’ Pointer tool will now automatically become the Fade tool on the TOP right and left of a region (click again and drag up and down to change the shape), and the Marquee tool when in the BOTTOM-half of a region. This is in addition to the traditional Pointer tool also being the Trim tool on BOTTOM left/right of a region, and Loop tool on MID-right of a region.
I recommend that you try these settings and persevere for long enough to get used to them, as it will speed up your editing, and it helps when jumping between Logic and Pro Tools. It does take a little more precision and decent zoom settings but the pay-offs are worth it.
It’s at this point in the article that I rediscovered the annoyances of trying to get decent screenshots of Logic’s tool cursors. You can’t do it with the usual Apple shortcuts or even the Grab utility. The cursor doesn’t show up as other than the usual boring cursor (Grab lets you choose a few other cursor options, but certainly not any of the Logic tool cursors).
SO – I made you a short video instead, using Screenflow. I show the “smart-tool” setup and use, then how to use the Marquee tool.
Here it is;

